Vodia Module
Integration & Billing for Vodia PBX
The Vodia module for ictVoIP Billing enables seamless integration with Vodia PBX systems, providing automated billing, multi-tenant management, and advanced API capabilities for service providers and enterprises.
Vodia Module Dashboard |
Overview
The Vodia module extends ictVoIP Billing to support Vodia PBX environments, allowing you to manage domains, automate extension provisioning, collect CDRs, and leverage RESTful APIs for real-time operations.
Key Features: * Multi-tenant Support – Manage multiple domains and tenants * CDR Integration – Automated call detail record collection and billing * Extension Management – Automated provisioning and management of extensions * RESTful API Integration – Full API support for automation and external integrations * Real-time Monitoring – Live system status and reporting * Secure Authentication – Token-based and user-based authentication * Client Area Integration – Advanced CDR viewing and billing management * Automated Billing – CRON-based autobill functionality with overage handling
Requirements
Vodia PBX: v68+
ictVoIP Billing: Latest version
WHMCS: 8.12+
PHP: 8.1, 8.2, 8.3
Web Server: Apache, Nginx, or LiteSpeed
HTTPS: Required for secure API communication
Installation
Follow these steps to install and configure the Vodia module:
Step 1: Download the Module
Download the latest Vodia module package from your client area or ictVoIP support.
Step 2: Upload Files
Upload the module files to your WHMCS server:
scp vodia_module_release.zip user@yourserver:/home/$user/tmp/
unzip vodia_module_release.zip -d /home/$user/public_html/modules/servers/vodia/
Step 3: Set Permissions
Ensure all files are readable by the web server:
chmod -R 755 /home/$user/public_html/modules/servers/vodia/
Step 4: Configure Vodia API Access
Enable API access in your Vodia PBX admin panel
Create an API user with appropriate permissions
Note the API endpoint and credentials
Step 5: Activate the Module in WHMCS
Go to System Settings → Products & Services → Servers
Add a new server and select Vodia as the module
Enter the API endpoint, username, and password
Step 6: Test the Connection
Use the Test Connection button to verify API access and resolve any errors before proceeding.
Configuration
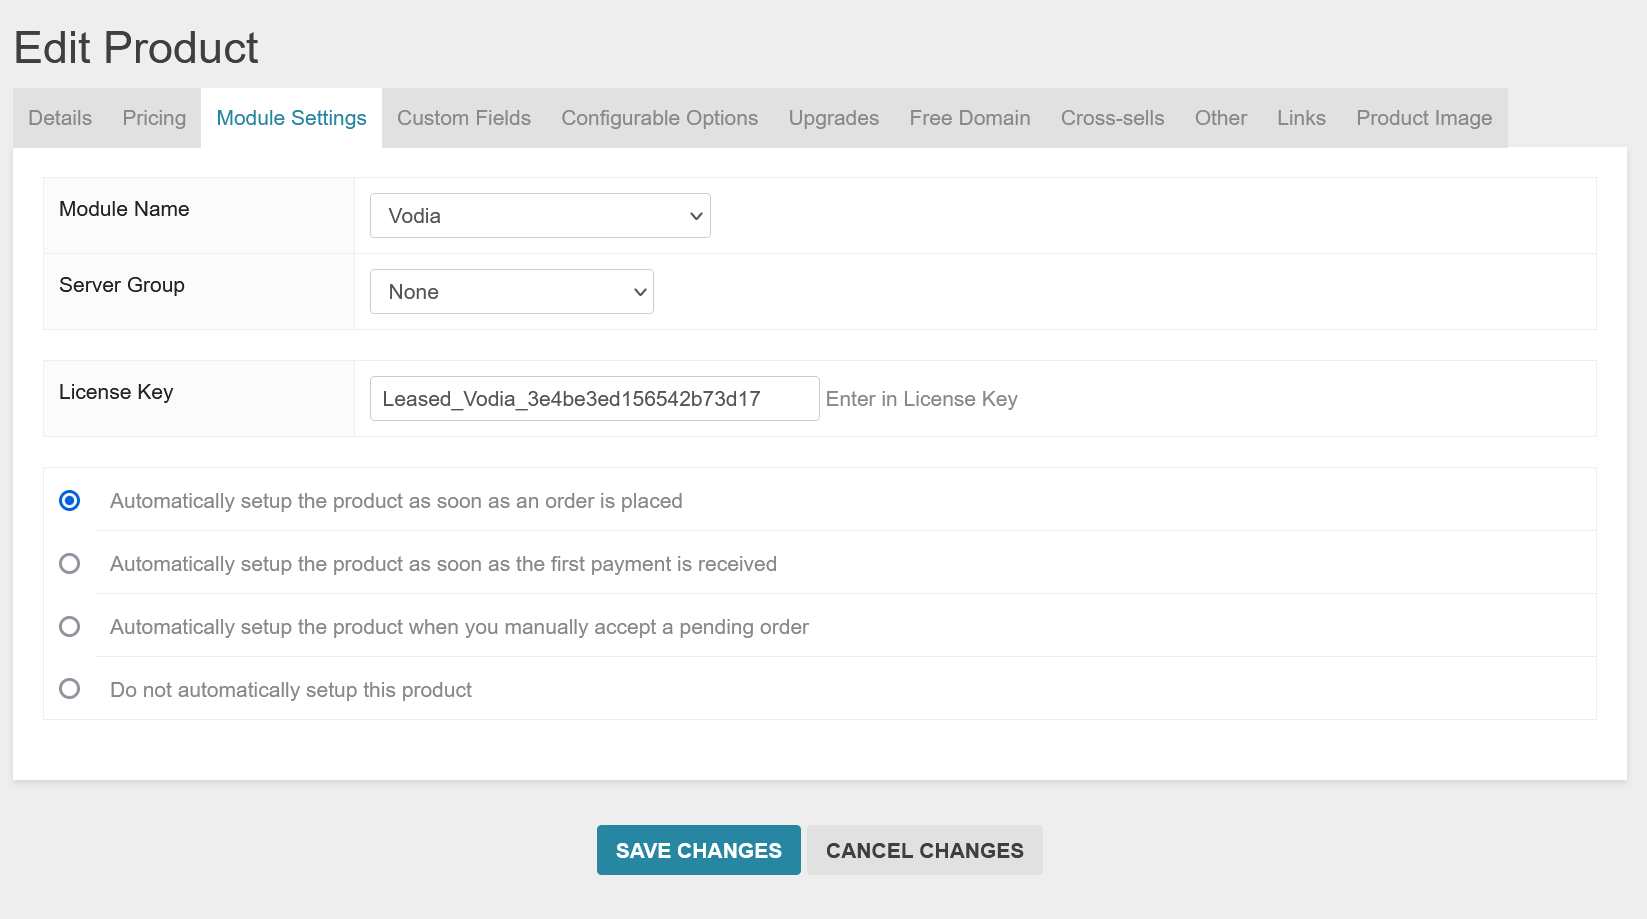
Server Module Setup
Create New Provider/PBX * Navigate to ictVoIP Billing → Providers * Create a new provider (e.g., “Telnyx - Vodia”) * Select the Vodia server module
Import Tariff/Rate Card * Import your provider’s CSV rate card * Map required columns: Description, Prefix, RateValue, Increment * Configure rate structures and pricing
Package Configuration * Select your Vodia VoIP product * Choose the imported tariff * Set country code and exit code for your billing region * Configure global markup and free minutes * Set up custom package rates if needed
Module Configuration Options
The Vodia module supports the following configuration options:
SIP Trunk – Vodia SIP trunk configuration
Dial Plan – Custom dial plan settings
Extension Type – Extension type configuration
VoiceMail – Enable/disable voicemail (yes/no)
Mailbox – Email notification settings (no/send email without attachment/send message as attachment)
Realtime Billing – Enable real-time billing (yes/no)
Bill Overage – Enable overage billing (yes/no)
Package ID – Associated package ID
US/CA Routing – Premium or value routing for USA48/Canada
Base Rate Per Minute – Base billing rate
International Routing – International call routing
International Rate Markup – Markup for international calls
Free Minutes – Free minutes allocation
Inbound Cost – Cost for inbound calls
Outbound Cost – Cost for outbound calls
Billing Roundup Inbound – Roundup settings for inbound calls
Billing Roundup Outbound – Roundup settings for outbound calls
Product Assignment Formatting
When assigning VoIP products to clients, follow these specific formatting requirements:
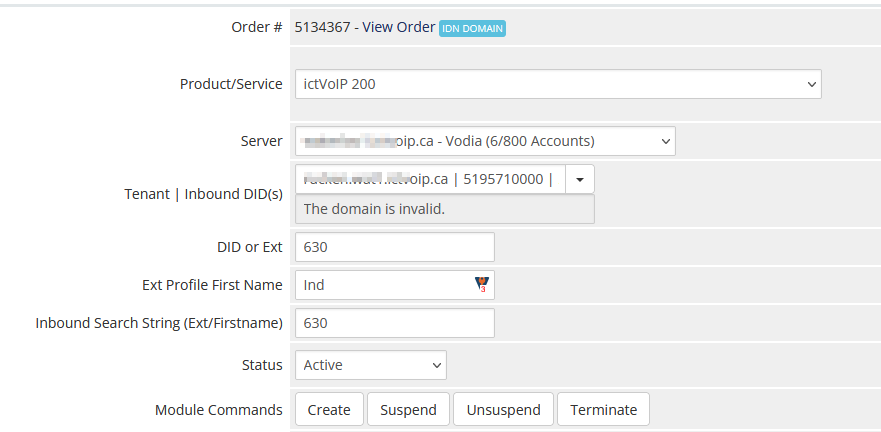
Example: Vodia Product Assignment Formatting in WHMCS
Required Fields:
Server Assignment * Select your Vodia PBX server from the dropdown * If only one server is configured, it will appear and be selected
Tenant and DID Configuration * Format: tenant.domain.com | DID1 | DID2 | DID3 * Example: rucken.wat1.ictvoip.ca | 5484815577 | 5197830020 | 8300
Extension Assignment * Enter the DID or extension for client billing * Example: 8300
Extension Profile Configuration * First Name: Use the client’s name * Inbound Search String: Extension or first name for routing
Example Configuration:
Server: Vodia PBX - Main
Tenant | DIDs: client.srv1.ictvoip.ca | 5484815577 | 5197830020 | 8300
Extension: 8300
First Name: John Smith
Inbound Search String: 8300
API Integration
API Endpoints
The Vodia module provides RESTful API access for:
CDR Collection – Automated call detail record retrieval
Extension Management – Create, modify, and delete extensions
Domain Management – Multi-tenant domain operations
Real-time Status – Live system monitoring
Authentication
The module supports multiple authentication methods:
Token-based Authentication – Secure API tokens
User-based Authentication – Username/password credentials
HTTPS Encryption – All API communications are encrypted
API Configuration
Enable API Access * Configure API settings in Vodia admin panel * Set appropriate access permissions * Generate API credentials
Configure WHMCS Integration * Enter API endpoint URL * Provide authentication credentials * Test API connectivity
Set Up CDR Collection * Configure CDR retrieval schedule * Set up automated billing processes * Monitor CDR collection status
CDR Processing
The Vodia module processes CDRs with the following considerations:
Outbound Calls – Retrieved from Destination column
Inbound Calls – Retrieved from Caller Destination column
Country Code Formatting – Recommended to include country codes
Local Prefix Handling – Configure prefix removal for local calls
Special Considerations:
Match your outbound formatting to include country codes
This eliminates the need for package rate filtering
Enable prefix removal for local/regional calls if needed
Configure timezone settings to match your PBX server
Client Area Features
CDR Management Interface
The Vodia module provides an advanced client area interface for CDR management:
DataTables Integration – Sortable and searchable CDR tables
Date Range Selection – Flexible date range filtering
Real-time Updates – AJAX-powered data loading
Export Capabilities – CSV export functionality
Billing Summary – Total minutes, free minutes, and billed amounts
Key Features:
Multi-provider Support – Automatic provider selection for clients with multiple services
Service-specific CDRs – Filter CDRs by specific service/extension
Billing Calculations – Real-time billing calculations with free minutes and overage
Call Type Filtering – Filter by inbound, outbound, and local calls
Disposition Tracking – Call success/failure status tracking
Client Area Templates
The module includes custom templates for enhanced user experience:
clientarea.tpl – Main CDR viewing interface
style.css – Custom styling for the interface
JavaScript Integration – Advanced DataTables and AJAX functionality
Automated Billing
Autobill Functionality
The Vodia module includes comprehensive automated billing capabilities:
CRON Integration – Automated billing via CRON jobs
Overage Handling – Automatic overage calculation and billing
Free Minutes – Free minute allocation and tracking
International Markup – Configurable international call markup
Billing Cycles – Support for monthly and other billing cycles
CRON Configuration
Set up the autobill CRON job:
# Run every 5 minutes
*/5 * * * * curl -s "https://yourdomain.com/modules/servers/vodia/autobill.php?runfrom=cron" >/dev/null 2>&1
Billing Features:
Real-time Billing – Optional real-time billing for immediate charges
Overage Billing – Automatic billing for usage beyond free minutes
International Rates – Separate international call billing
Roundup Settings – Configurable billing roundup for inbound/outbound calls
Exclusion Lists – Exclude specific numbers from billing
Suppression Lists – Suppress specific numbers from CDR processing
Billing Calculations:
Base Rate – Configurable per-minute base rate
Free Minutes – Monthly free minute allocation
Overage Rate – Rate for minutes beyond free allocation
International Markup – Additional markup for international calls
Inbound/Outbound Costs – Separate costs for different call types
Troubleshooting
Common Issues and Solutions
Connection Problems:
API Authentication Failed * Verify API credentials in Vodia admin panel * Check username and password accuracy * Ensure API access is enabled
Network Connectivity Issues * Verify HTTPS connectivity to Vodia server * Check firewall rules and network access * Test API endpoint accessibility
CDR Processing Issues:
No CDRs Retrieved * Verify CDR collection is enabled * Check API permissions for CDR access * Review CDR collection schedule
Incorrect Billing Data * Verify tenant and extension formatting * Check country code configuration * Review rate mapping and package settings
Extension Management Issues:
Extensions Not Created * Verify extension creation permissions * Check tenant configuration * Review extension naming conventions
Extension Routing Problems * Verify inbound search string configuration * Check DID assignment and routing * Review extension profile settings
Client Area Issues:
CDR Table Not Loading * Check JavaScript console for errors * Verify DataTables library loading * Check AJAX request responses
Date Range Issues * Verify date format compatibility * Check timezone settings * Review date range validation
Debug and Testing
Manual Testing:
Test API Connection * Use the Test Connection button in WHMCS * Verify successful authentication * Check for error messages
Test CDR Collection * Run manual CDR collection * Review collected data * Verify billing calculations
Test Extension Operations * Create test extensions * Verify extension functionality * Test call routing
Test Client Area * Access client area CDR interface * Test date range selection * Verify data table functionality
Log Monitoring:
Monitor system logs for issues:
# Check Vodia module logs
tail -f /var/log/vodia_module.log

# Check WHMCS error logs
tail -f /var/log/whmcs.log

# Check API access logs
tail -f /var/log/api_access.log

# Check autobill logs
tail -f /var/log/autobill.log
Support Information
For Vodia module issues, provide:
Vodia PBX version and configuration
WHMCS version and PHP version
API credentials (if applicable)
Error messages and logs
Network configuration details
Client area template modifications
Next Steps
After successful Vodia module configuration:
Test All Functionality – Verify CDR collection, billing, and extension management
Configure Client Products – Set up client VoIP services
Monitor Performance – Track API performance and CDR processing
Set Up Automation – Configure automated billing and suspension processes
Customize Client Area – Modify templates for branding and functionality
Configure CRON Jobs – Set up automated billing and monitoring
For additional configuration options and advanced features, see the detailed guides in the sidebar navigation.