Client Admin Area
Product Assignment
Administration of server modules and billing would be setup with client products. After you have your Addon and Server module installed and have created a VoIP product either metered or not you can add the product to the WHMCS client products. This example shows that you already have knowledge of adding products to your client accounts. Further information can be located with the WHMCS supported documentation here: WHMCS Docs
Formatting to FusionPBX API
In ictVoIP Billing v1.4.0, FusionPBX tenant and extension details are normally managed through the Client Services Admin Area rather than manually typed into the product fields.
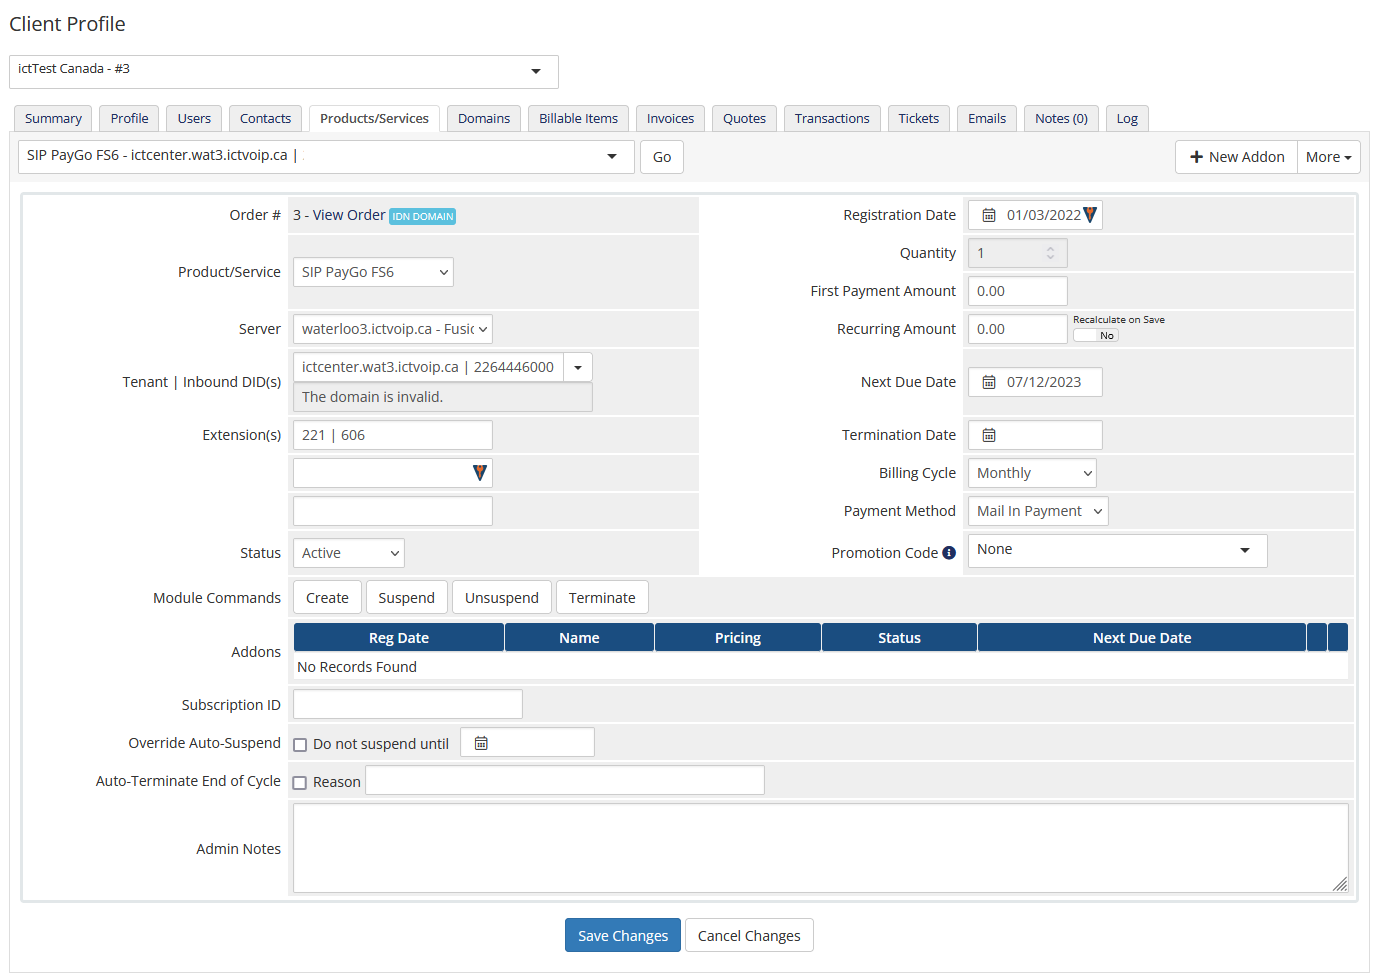
Assign your FusionPBX-backed VoIP product to the client as usual. Behind the scenes this links the WHMCS service to a FusionPBX server record and tenant.
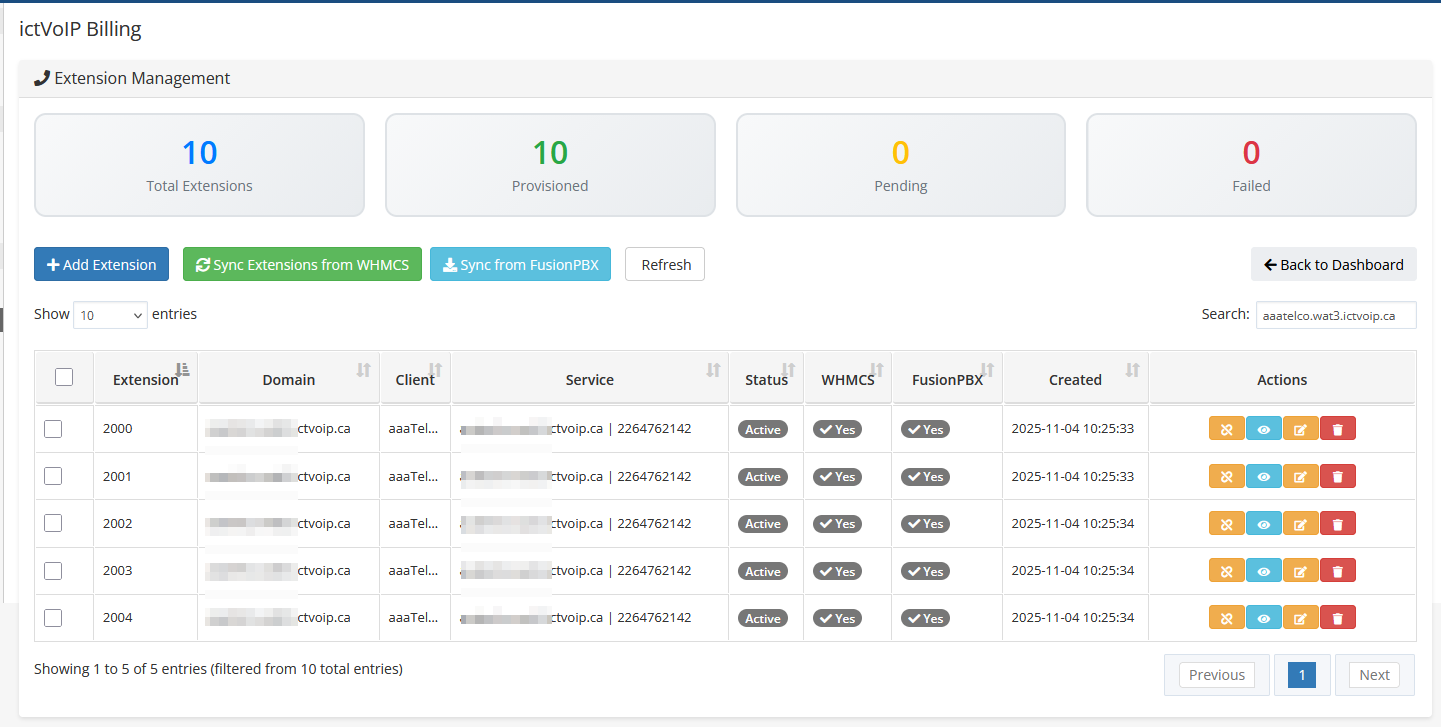
Use the Client Services Admin Area (Client Services Admin Area) to create or manage the tenant/domain and to provision extensions. When you add extensions and assign them to the client service from there, the required formatting for CDR views and billing is handled automatically.
To validate that everything is wired correctly, open the client’s CDR view in the Client Area for the FusionPBX service and confirm that calls are displayed as expected.
Formatting to Vodia API
Once your VoIP product has been assigned there are fields formatting which must be followed.
Assign your Vodia PBX server from the drop down. If only one server has been assigned it will appear and be selected.
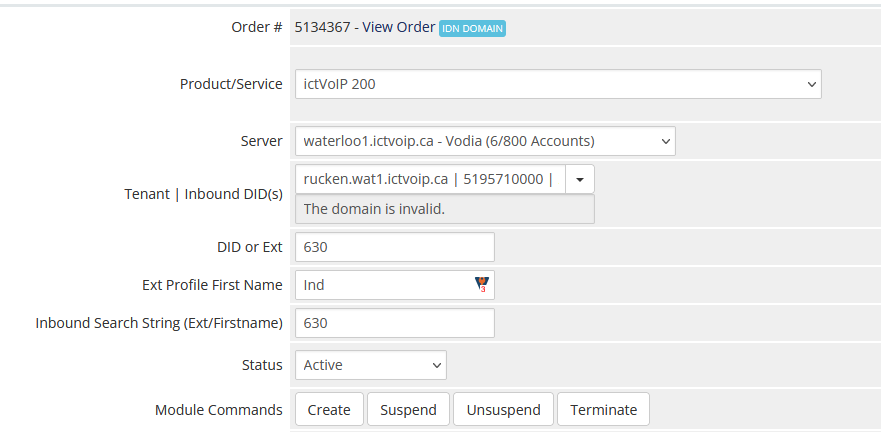
Assign the Tenant | Inbound DID(s) to Tenant
rucken.wat1.ictvoip.ca | 5484815577 | 5197830020 | 8300
8300
Inbound Search String (Ext/Firstname)
Formatting to LesNet API
Once your VoIP product has been assigned there are fields formatting which must be followed.
Assign your LesNet API server from the drop down. If only one server has been assigned it will appear and be selected.
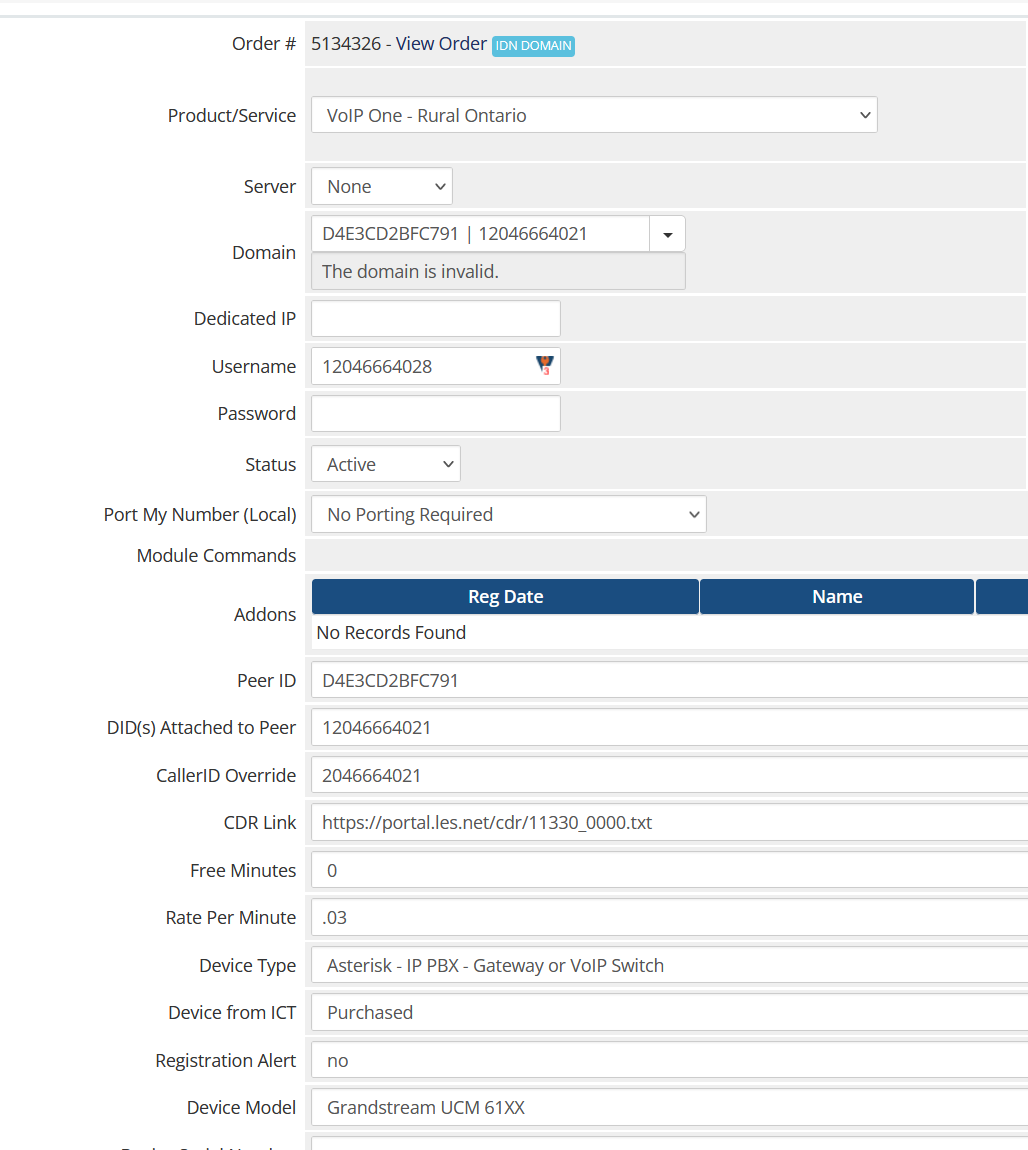
2) Domain is Peer | DID
D4E3CD2BFC791 | 12046664021
12046664021
Custom Product Fields
Peer ID
D4E3CD2BFC791
12046664021
https://portal.les.net/cdr/11330_0000.txt
The external CDR text file from LesNet only updates every 24hrs. Set your CRON for autobill accordingly.
Special Considerations:
Our API pulls the CDR outbound details from the Destination column within FusionPBX and the inbound from the Caller Destination column.
It is best to try and match your formatting outbound to include your Country code. This will elliminate the requirement for the use of the filter used within setting your package rates.
“Check to Enable” if your PBX CDRs use a prefix for local/regional calls as where you do not use your country code. For further information about this setting please refer to the VoIP Package Rates section.
Low Credit Balance Alerts/Suspend
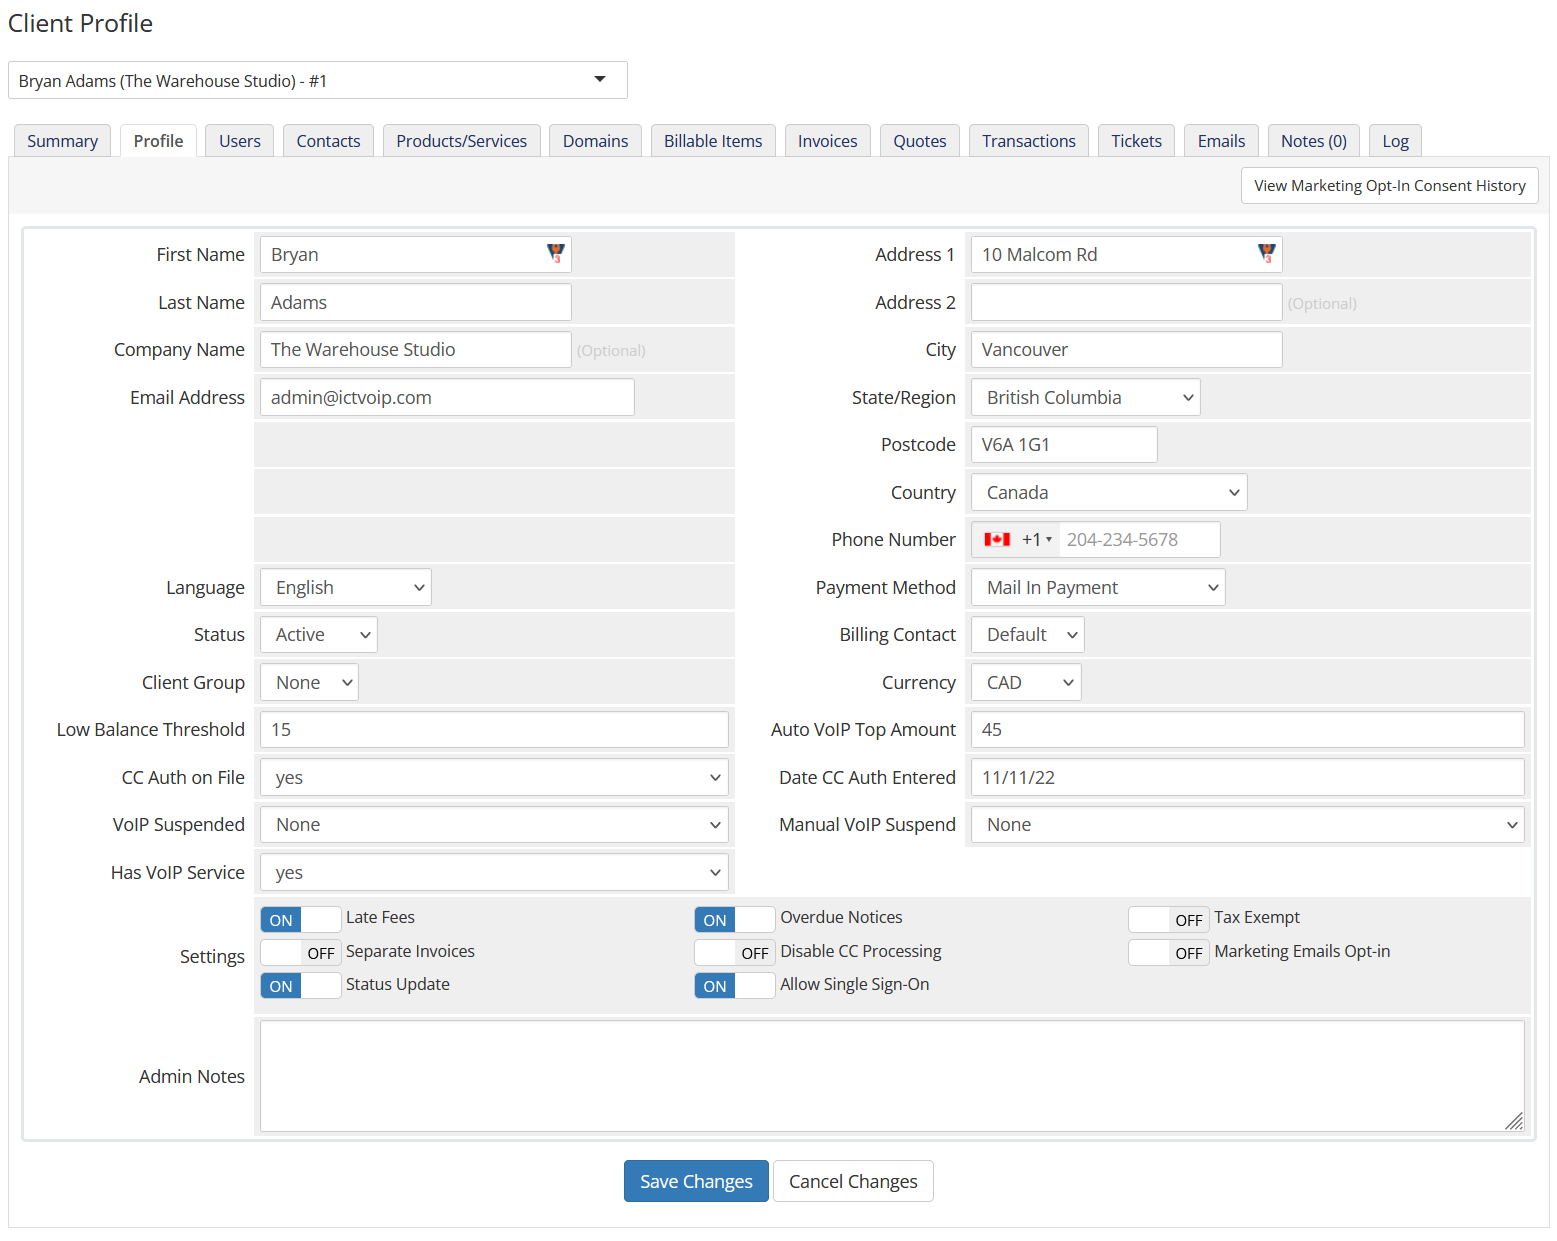
Low Credit Balance Thresholds are set within the Client Profile. When a low balance threshold has been set this will allow for a couple of automation events.
Low Balance
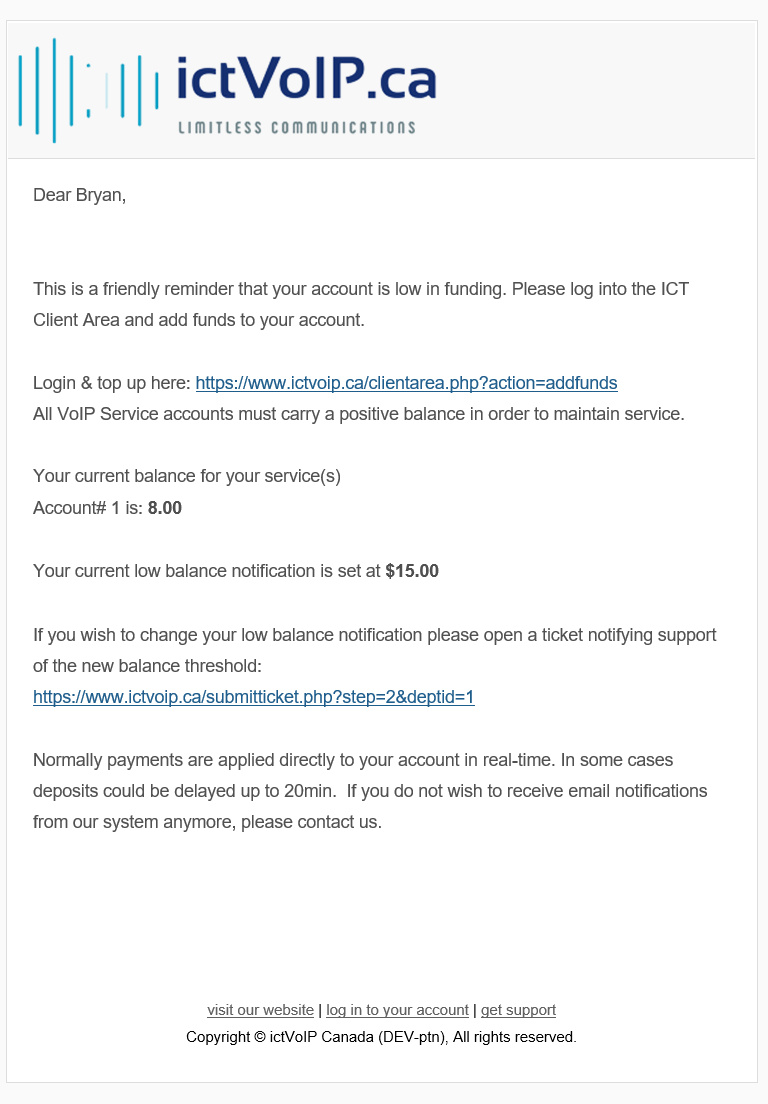
When the credit balance falls below the set threshold an alert email is sent during the Daily WHMCS CRON. A custom email Template located in General Messages must be created with the name “Low Balance Alert” and can include the following as an example:
Dear {$client_first_name},

This is a friendly reminder that your account is low in funding. Please log into the ictVoIP Client Area and add funds to your account.

Login & top up here: https://www.ictvoip.ca/clientarea.php?action=addfunds
All ictVoIP Service accounts must carry a positive balance in order to maintain service.

Your current balance for your service(s)
Account# {$client_id} is: {$client_credit}

Your current low balance notification is set at ${$client_custom_field_lowbalancethreshold}.00

If you do not wish to receive email notifications   from our system anymore, please contact us.
You may also check that your Low Balance Alerts are working with CRON by invoking the WHMCS CRON manually and setting the low balance to less than the clients account balance.
php -q /home/$user/whmcsdata/crons/cron.php all -F -vvv
Suspend
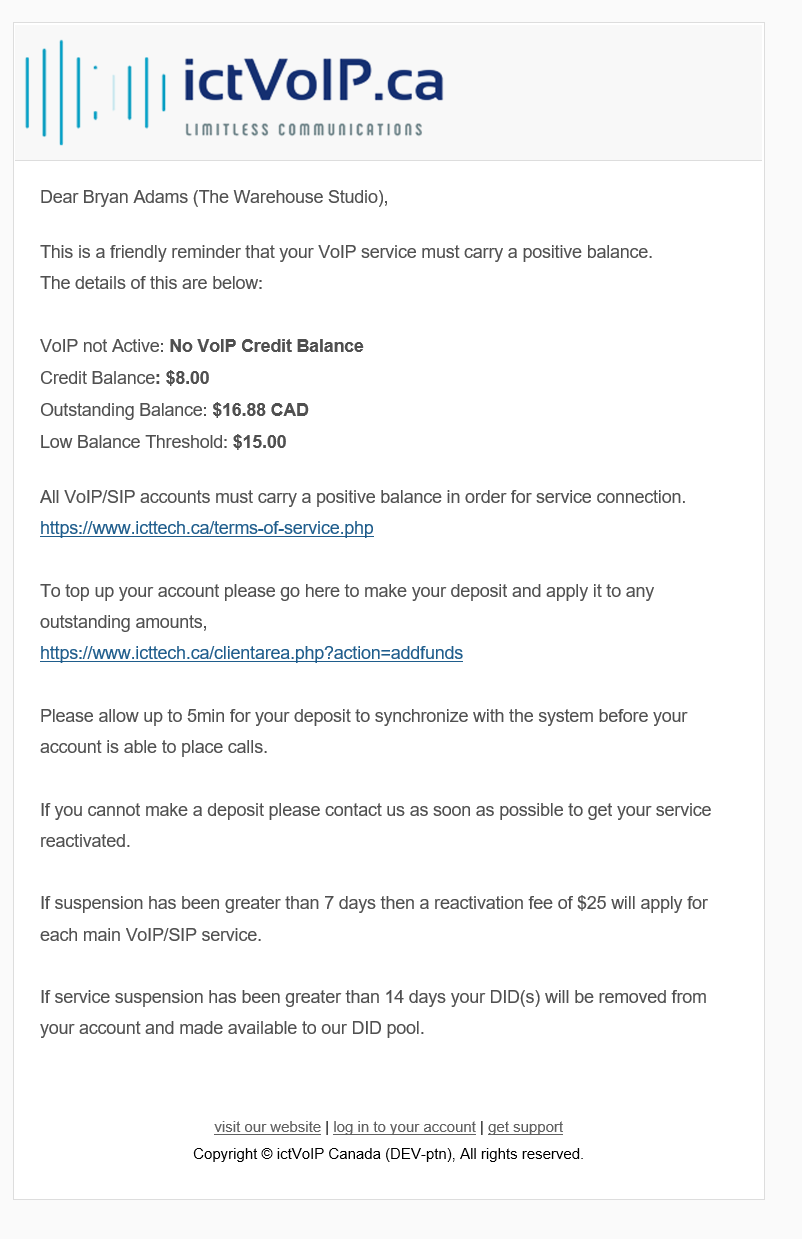
When the credit balance is zero and or a possible balance owing greater than the credit blance then Autosuspend CRON will suspend all calls for that service depending on your Server Module. Once a top up of the account has been provided and the account has a positive credit balance with no outstanding balances then the AutoSuspend CRON will un-suspend the account. This process is done by triggering the PBX/Switch to either disable the Gateway/Trunk or API to Providers suspend function. For certain accounts you have the option of manually overriding the auto suspend by setting the “VoIP Suspended” to No and the “Manual VoIP Suspend” to No. An auto generated email can be sent to the client by creating an email template within General Messages and must have the name “VoIP Zero Balance” and can have the following as an example:
Dear {$client_name},

This is a friendly reminder that your ictVoIP service must carry a positive balance.
The details of this are below:

ictVoIP not Active: No VoIP Credit Balance
Credit Balance: ${$client_credit}
Outstanding Balance: {$client_due_invoices_balance}
Low Balance Threshold: ${$client_custom_field_lowbalancethreshold}.00

All VoIP/SIP accounts must carry a positive balance in order for service connection.

To top up your account please go here to make your deposit and apply it to any outstanding amounts,
https://www.ictvoip.ca/clientarea.php?action=addfunds

Please allow up to 1min for your deposit to synchronize with the system before your account is able to place calls.

If you cannot make a deposit please contact us as soon as possible to get your service reactivated.
AutoSuspend
See also
For detailed testing procedures and troubleshooting stuck suspension states, see AutoSuspend Testing Guide.
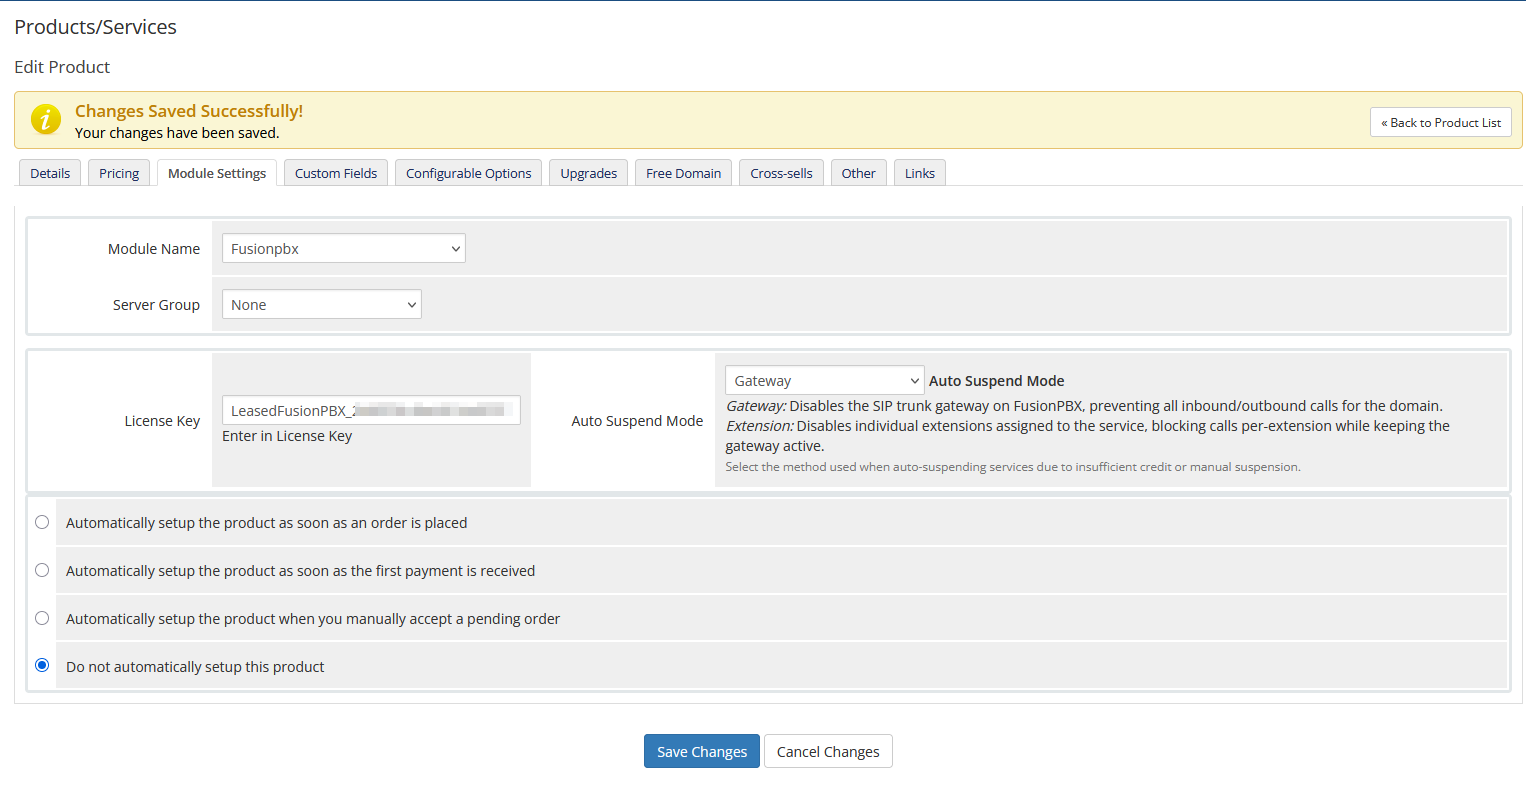
Auto Suspend Mode (FusionPBX)
For FusionPBX server module products, administrators can configure how services are suspended when credit runs out or manual suspension is triggered. This setting is found in the Product/Service Module Settings.
Mode |
Description |
|---|---|
Gateway (Default) |
Disables the SIP trunk gateway on FusionPBX, preventing all inbound/outbound calls for the entire domain. This is the traditional suspension method. |
Extension |
Disables only the individual extensions assigned to the service (stored in the service’s Dedicated IP field). The gateway remains active, allowing other extensions on the same domain to continue making calls. |
Note
When to use Extension mode:
Multi-tenant environments where multiple clients share a single FusionPBX domain
Scenarios where you want to suspend specific extensions without affecting the entire trunk
Services where extensions are assigned per-client in the Dedicated IP field
Warning
Do not change Auto Suspend Mode while clients are suspended
The unsuspend process uses the current product setting, not the mode that was used when suspending. If you change the mode while a client is suspended:
Client suspended with Extension mode → Admin changes to Gateway → Unsuspend enables gateway but extensions remain disabled
Client suspended with Gateway mode → Admin changes to Extension → Unsuspend enables extensions but gateway remains disabled
If you must change modes, manually unsuspend affected clients first, then change the setting.
AutoSuspend CRON
The CRON for autosuspend example: (replace MYMODULE with the server module you have installed)
Important
AlmaLinux 9 / systemd Timezone Configuration
On AlmaLinux 9 / systemd-based systems, cron jobs may default to UTC even when the server timezone is correctly configured.
Solutions:
Per-CRON Timezone (Recommended): Specify
TZ=explicitly in each WHMCS cron job to ensure automation runs at the expected time.System-Wide PHP INI: Update the system PHP INI configuration to set
date.timezonesystem-wide if this option is available on your hosting environment.
# With explicit timezone (recommended for AlmaLinux 9 / systemd)
*/5    *    *    *    *  TZ=America/Toronto https://www.mywhmcsserver.com/modules/servers/MYMODULE/autosuspend.php?runfrom=cron >/dev/null 2>&1

# Alternative: Using curl with timezone
*/5    *    *    *    *  TZ=America/Toronto curl -s "https://www.mywhmcsserver.com/modules/servers/MYMODULE/autosuspend.php?runfrom=cron" >/dev/null 2>&1
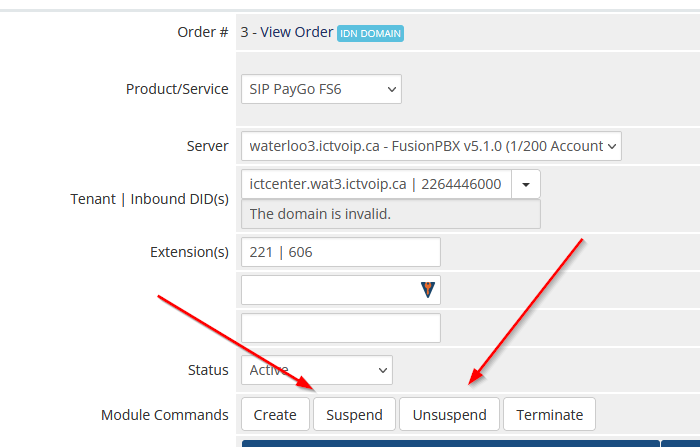
Manual Suspend
If you do not wish to use the Autosuspend feature you may manually trigger the Suspend & Unsuspend commands within the Clients VoIP Product.
Custom Client Profile Fields
Some settings for client VoIP services should be defined if you wish to use the autosuspend, low balance alerts and auto top-ups.
Autosuspend
Note
Only Applies to our Custom API Modules:
These fields have no affect if using the FusionPBX Server Module
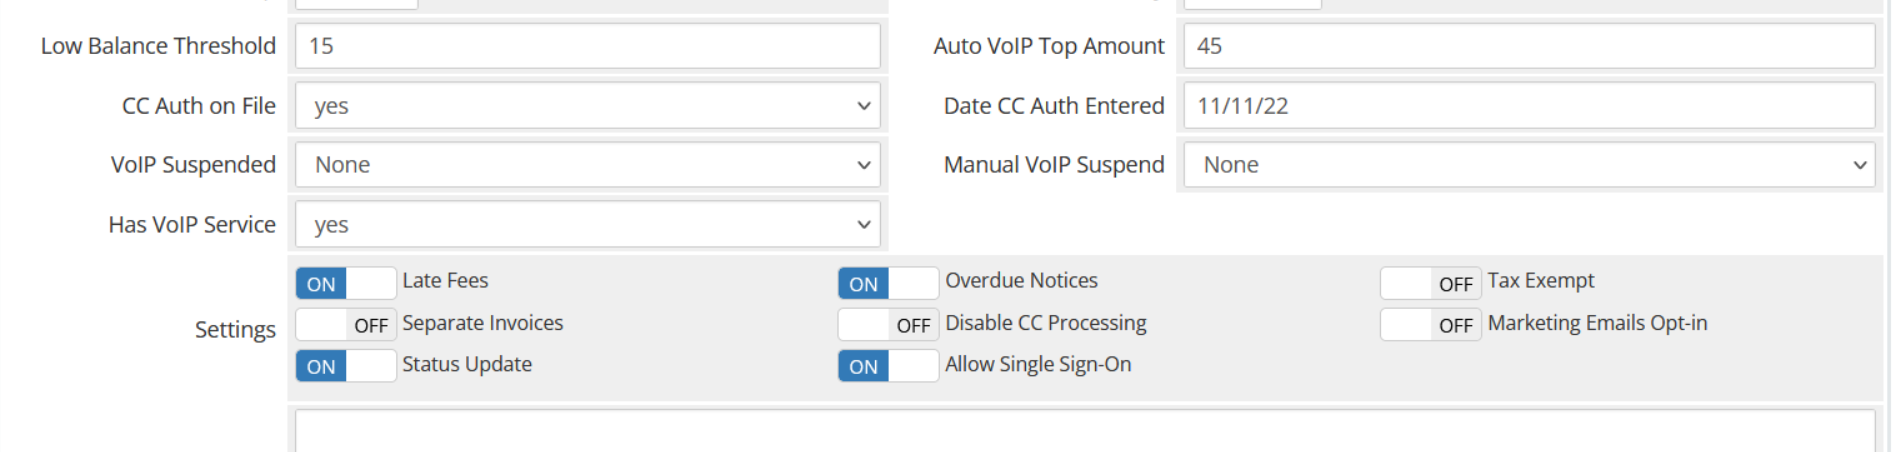
Required to enable autosuspend “Has VoIP Service” to Yes. “Manual VoIP Suspend” can be used to suspend all VoIP services and “VoIP Suspended” will provide the state of suspension which can produce an override by selecting Yes or No. “None” is the default position for Autosuspend.
Low Balance Threshold
The value set here indicates the credit balance threshold that when reached or falls below this value will send an email alert from a custom email template, as noted above, letting the client know that it is time to top-up. Leaving this field blank indicates that Low Balance threshold is not followed and is disabled from sending alerts.
Auto VoIP Top-Up
TBA
Fields used for this function are “CC Auth on File”, “Date CC Auth Entered” and “Auto VoIP Top Amount”. Currently they are not active. To have this feature available please contact Sales @ ictVoIP.ca