Server Management
PBX Server Integration & API Configuration
The Server Management section covers the installation and configuration of PBX server modules, enabling seamless integration between your WHMCS system and various PBX platforms.

Overview
Server modules allow you to provision and manage PBX servers directly from your WHMCS admin panel. This integration provides automated provisioning, billing, and management capabilities for your PBX infrastructure.
Supported PBX Platforms: * FusionPBX 5.3.x+ * Vodia PBX * Custom PBX integrations
Key Features:
Automated server provisioning
Real-time server status monitoring
Integrated billing and management
API-based communication
Multi-server support
For version-specific upgrade steps for the FusionPBX server module and related APIs, refer to Upgrading ictVoIP Billing and FusionPBX Integration.
FusionPBX Integration
Supported Versions: * FusionPBX 5.3.x (current) * FusionPBX 5.4.x (current)
Note
For older version support, please contact our support team.
Package Information:
You may receive a bundled package containing both FusionPBX and WHMCS modules: * Package: ictvoip_fusionPBX_module-v1.4_PHP8.1-8.3.zip * Contents: FusionPBX API scripts + WHMCS Server Module * We now offer an install script for our APIs or custom Theme which we recommend
FusionPBX API & Theme Installation
Step 1: Download and Extract Locally
Download the FusionPBX Server module package from your client area and extract it on your local machine:
Package: ictvoip_fusionPBX_module-release-v1.4_PHP8.1-8.3.zip
After extraction, the package structure is:
ictvoip_fusionPBX_module-release-v1.4_PHP8.1-8.3/
├── FusionPBX Host/
│   └── fpbx_apis-theme/
│       ├── ictvoip_fpbx5-3_apis/
│       └── ictvoip_fpbx5-3_theme/
└── WHMCS/
    └── (WHMCS server module files)
Step 2: Upload to FusionPBX Server
Using an SFTP client (such as WinSCP), connect to your FusionPBX server as root and upload the directories you need:
Navigate into
FusionPBX Host/fpbx_apis-theme/on your local machine.Upload
ictvoip_fpbx5-3_apis/to/root/on your FusionPBX server.Optionally upload
ictvoip_fpbx5-3_theme/to/root/if you want the custom theme.
Step 3: Run the API Installer Script
SSH into your FusionPBX server and run:
cd /root/ictvoip_fpbx5-3_apis
chmod +x install_apis.sh
./install_apis.sh
Step 4: (Optional) Run the Theme Installer
If you uploaded the theme folder:
cd /root/ictvoip_fpbx5-3_theme
chmod +x install_theme.sh
./install_theme.sh
Step 5: Verify Installation
Review the install log generated by the script and watch for any warnings or errors. The script handles file placement, permissions, and patching automatically.
WHMCS Server Module Installation
Step 1: Locate WHMCS Files
From the extracted package on your local machine, navigate to the WHMCS/
folder which contains the server module files.
Step 2: Upload to WHMCS
Upload the server module files to your WHMCS installation:
Destination: /home/$user/public_html/modules/servers/fusionpbx/
You can use SFTP or your hosting file manager to upload the files.
Server Configuration
Step 1: Access Server Management
Navigate to your WHMCS admin panel: * System Settings → Products & Services → Servers
Step 2: Add New Server
Note
Before adding your server(s) you must have an SSL certificate applied to your FusionPBX host. For instructions on obtaining and configuring SSL certificates using Let’s Encrypt, see Let’s Encrypt & SSL/TLS Setup.
Click Add New Server and configure the following settings: |
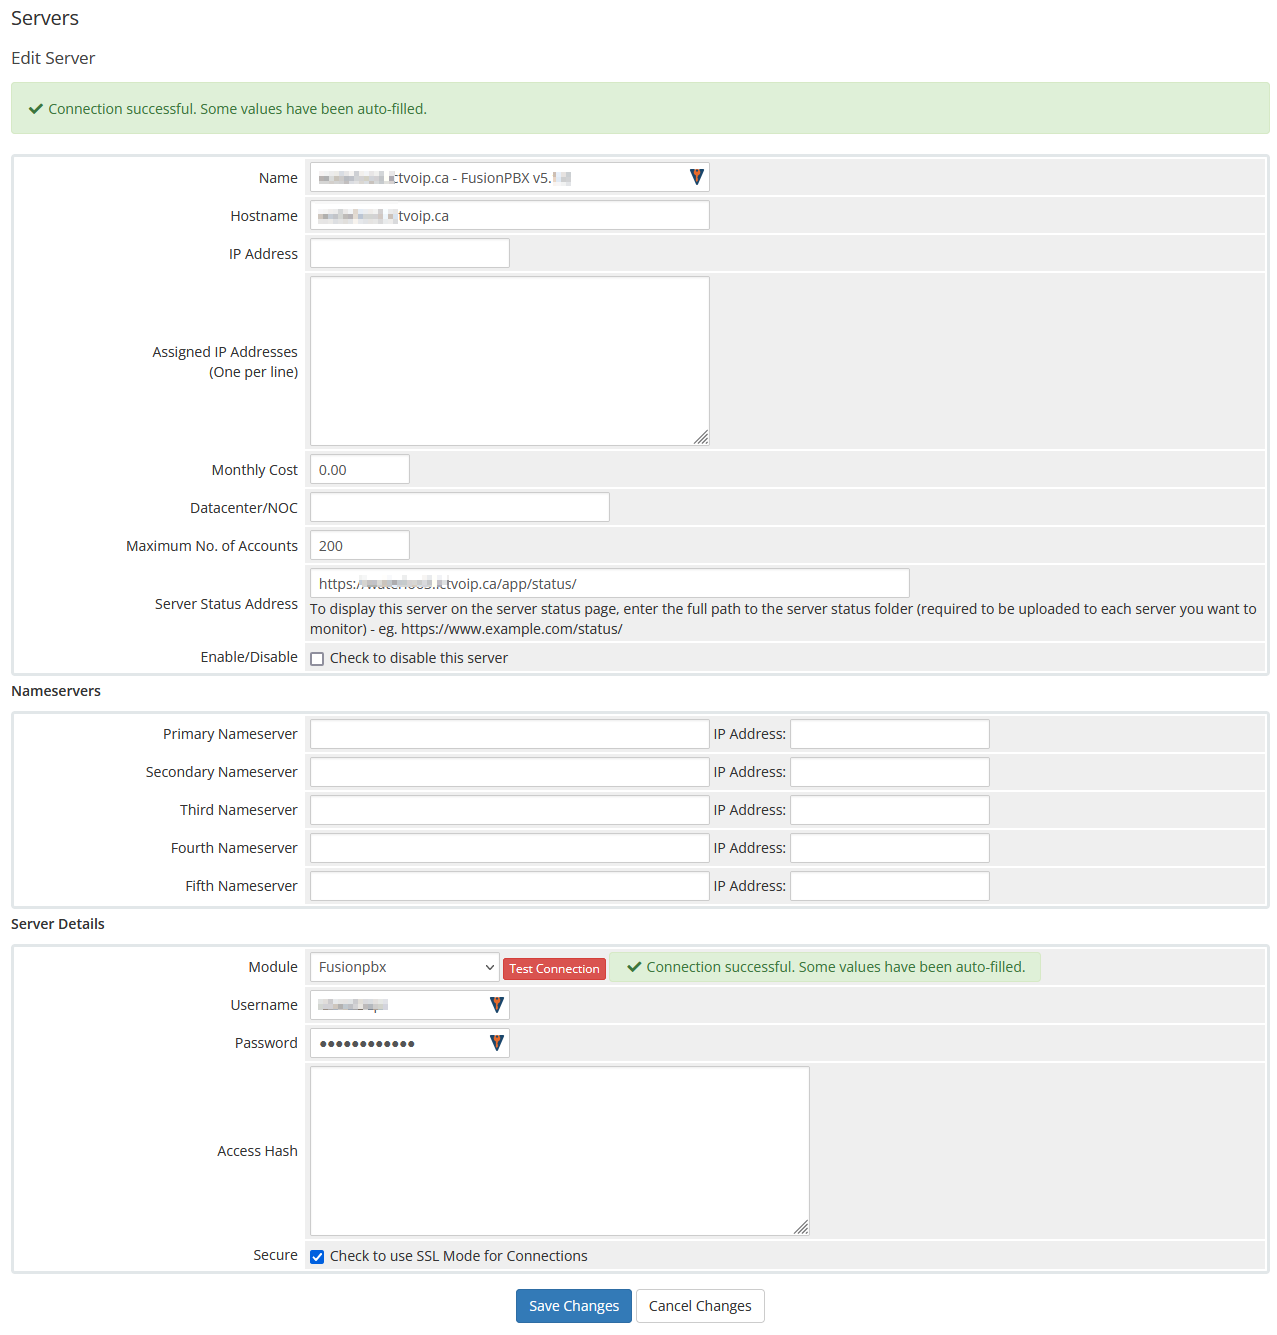
Required Configuration (WHMCS Server Record):
Server Name: voipsrv1.ictvoip.ca - FusionPBX v5.4.9
Hostname: voipsrv1.ictvoip.ca
IP Address: 102.100.100.20
Assigned IP addresses: 102.100.100.20
Maximum No. of Accounts: 100
Module: Fusionpbx
Username: voipsrv1api
Password: [YOUR_SECURE_PASSWORD]
Access Hash: [OPTIONAL_API_ACCESS_HASH]
Configuration Details:
Server Name: Descriptive name for your server.
Hostname: FQDN with an active SSL certificate that matches the PBX web interface.
IP Address / Assigned IP: Local or public IP address used to reach the PBX.
Maximum Accounts: Maximum tenants or extensions for this PBX.
Module: Select the relevant PBX module (for example, “Fusionpbx”).
Username / Password: FusionPBX (or other PBX) admin/API credentials.
Access Hash (optional): Long token used by some integrations as an alternative or complement to username/password for API access.
Setting a Default FusionPBX Server
When you have multiple FusionPBX servers configured in WHMCS, you should designate one as the default server. The default server is used when provisioning new services that do not have a specific server assignment.
To set a server as default:
Navigate to System Settings → Products & Services → Servers.
In the server list, click on the server name link you want to set as default.
The server marked with an asterisk (*) is the current default.

Note
If you only have one FusionPBX server, it is automatically used as the default. Setting a default is only necessary in multi-server environments.
Step 3: Create API User & Generate Hash Key
The API user must be assigned to the FQDN domain of your FusionPBX server
(for example, voipsrv1.ictvoip.ca). This ensures the user has access to
all tenant domains on that server.
Log in to your FusionPBX web interface.
Navigate to Advanced → Users.
Create a new user or edit an existing API user.
Assign the user to the superadmin group.
Set the Domain to your FusionPBX server’s FQDN (e.g.,
voipsrv1.ictvoip.ca).Click the Generate button next to the API Key field to create a hash.
After saving, view the user again to copy the generated API Key/Hash.
Add this hash to your WHMCS server configuration in the Access Hash field.
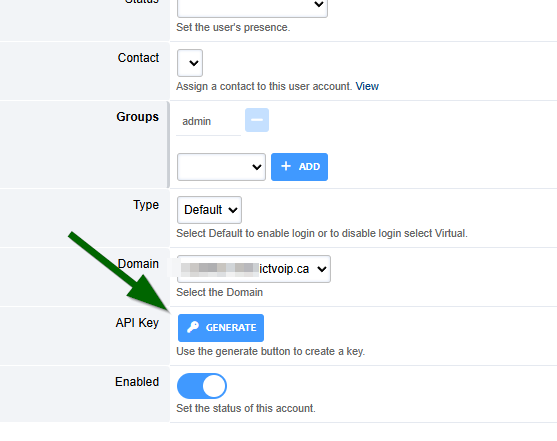
Important
The API user must be on the server’s FQDN domain, not a tenant domain. This grants the user access to manage all tenants on that FusionPBX server.
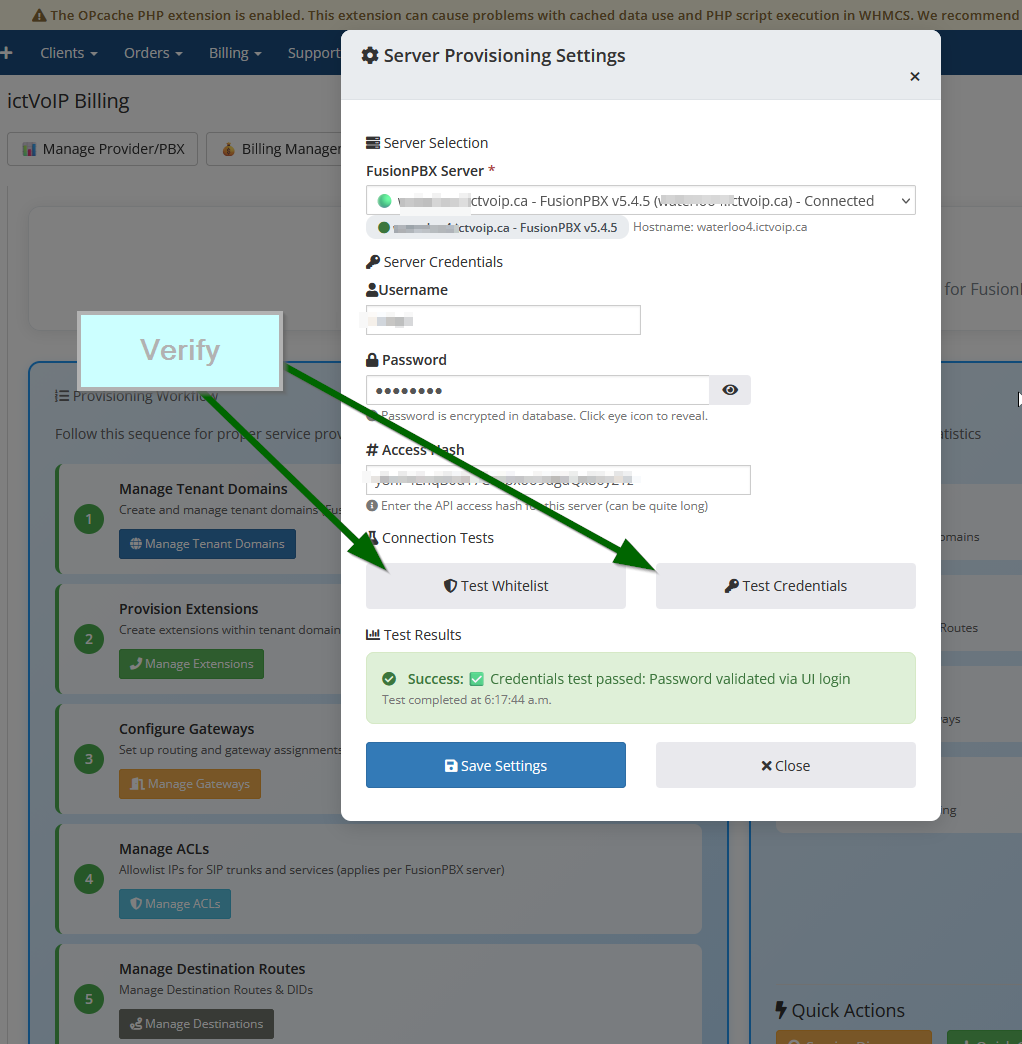
API Credential/Whitelist Verification
Recommended: Client Services / Server Provisioning Settings
Navigate to the Client Services area within the ictVoIP Billing admin UI and open the Settings or Server Provisioning Settings panel for the provider/PBX you are configuring.
From there you can load the WHMCS server credentials (username, password, and optional access hash) for a selected server, so that the addon can use them for connection and provisioning tests.
You can also run a credential test to verify that the FusionPBX (or other PBX) login works over HTTPS using the configured credentials.
Finally, you can run a whitelist/API reachability test to confirm that the WHMCS server IP is allowed by the PBX IP whitelist and that the expected version/status endpoints respond.
These tests are read-only from the PBX perspective and are intended to help you validate server configuration before you rely on automated provisioning. For additional security guidance on API whitelisting, see Security Hardening Overview.
Common Connection Issues:
SSL Certificate: Ensure valid SSL certificate on FusionPBX
Firewall: Check firewall rules allow API access
API User: Verify API user has correct permissions
Network: Ensure network connectivity between WHMCS and FusionPBX
Security Considerations
Best Practices:
Use strong, unique passwords for API users
Enable SSL/TLS encryption
Restrict API access to specific IP addresses
Regularly update API user credentials
Monitor API access logs
Firewall Configuration:
Ensure your firewall allows API communication:
# Allow HTTPS traffic to FusionPBX
ufw allow 443/tcp

# Allow specific IP ranges if needed
ufw allow from WHMCS_IP to any port 443
Troubleshooting
Common Issues:
Connection Failed: Check hostname, credentials, and network connectivity
Permission Denied: Verify API user has superadmin rights
SSL Errors: Ensure valid SSL certificate is installed
Module Not Found: Verify server module files are properly installed
Debug Steps:
Check WHMCS error logs
Verify FusionPBX API accessibility
Test API credentials manually
Review firewall and network configuration
Support:
For additional support, contact our team with: * WHMCS version and PHP version * FusionPBX version * Error messages and logs * Network configuration details
Server Widget
This feature is optional |
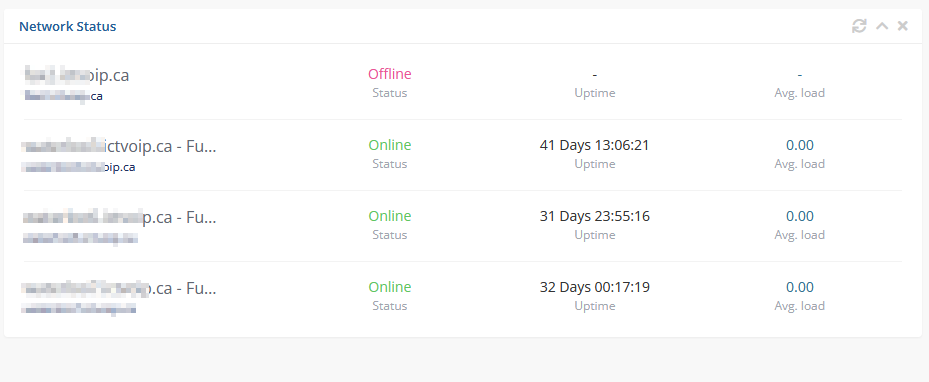
FusionPBX Status Widget
Adding a FusionPBX Status Widget for your Servers can be accomplished by the following steps:
Copy from your WHMCS host (must match your current WHMCS version, we ship v8.13)
/home/$user/public_html/status/index.php
to your FusionPBX host. Create the status directory if it does not exist.
/var/www/fusionpbx/app/status/index.php
chown -R www-data:www-data /var/www/fusionpbx/app/status
WHMCS Setup
Add the status script location to your WHMCS Fusion PBX Server.
WHMCS / System Settings / Serversselect edit the server to monitor and enter the URL for “Server Status Address”
https://myfusionpbx.ca/app/status/
Then save.

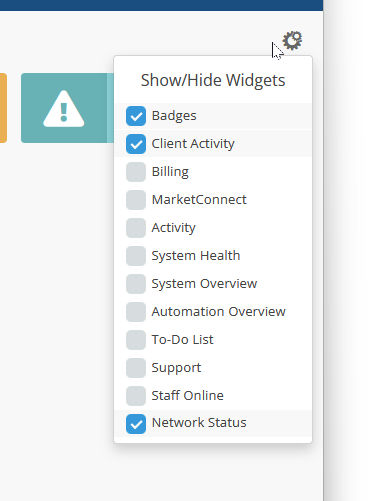
Add the Widget to your WHMCS Admin area by selecting the “Network Status” from the COG settings for Widgets at the top right of the Admin Dashboard.
Next Steps
After successful server configuration:
Provider Setup - Configure VoIP providers
Tariff Configuration - Set up pricing structure
Package Creation - Create service packages
Client Provisioning - Set up client accounts