ictVoIP Box
Overview
The ictVoIP Box addon is a WHMCS addon module that extends the ictVoIP Billing platform to provide client-facing purchasing of FusionPBX products with backend admin provisioning workflows.
ictVoIP Box integrates with the core ictvoipbilling addon and the FusionPBX server modules so that the PBX side (tenants, extensions, gateways, routes) and the billing side (services, CDRs, packages) stay aligned.
Architecture
The platform consists of three integrated components:
- 1. ictVoIP Billing Addon (Required Dependency)
Core billing and provisioning engine
FusionPBX server management
Provider integration
Client services tracking
Extension and gateway management
Tenant domain management
- 2. ictVoIP Box Addon (This Module)
Client-facing shopping cart integration
Product ordering interface
Regulatory data collection
Admin provisioning queue
Order workflow management
- 3. FusionPBX Server Modules (Required Dependency)
Backend PBX infrastructure
Multi-tenant hosting
SIP gateway configuration
Extension and routing management
Call processing and CDR
Integration Flow
The complete integration flow follows this sequence:
Client Orders → Custom ictVoIP Box Order Cart → ictVoIP Box →
Admin Queue → Admin Provisions → FusionPBX + Provider
Client orders FusionPBX products through custom ictVoIP Box checkout cart
ictVoIP Box captures order and regulatory data
Admin Queue displays pending orders for review
Admin provisions to FusionPBX and provider
System sends welcome email with FusionPBX credentials to client
Important
The custom ictVoIP Box order cart must be assigned to products or bundles using the Product Group Checkout Template selection in WHMCS product configuration.
System Requirements
WHMCS Platform
WHMCS Version: v9.0.3 or lower
PHP Version: 8.3 (preferred)
Database: MySQL 5.7+ or MariaDB 10.3+
Web Server: Apache or Nginx with mod_rewrite
SSL Certificate: Required for secure API communication
Required Addons
ictVoIP Billing Addon: Core dependency (must be installed first)
ictVoIP Box Addon: This module (requires valid license)
Required Server Modules
FusionPBX Server Module: For FusionPBX server management in WHMCS
FusionPBX Servers
FusionPBX Version: 4.5+ recommended
API Access: Enabled with valid credentials
Multi-Tenant: Enabled
SIP Ports: 5060 (UDP), 5061 (TLS)
RTP Ports: 10000-20000
Provider Accounts
Provider 1 Account: API credentials configured in ictVoIP Billing
Provider 2 Account: API key configured in ictVoIP Billing
Note
Provider 1 supports both sandbox and production modes. Provider 2 should remain in sandbox mode during alpha testing.
High-Level Capabilities
At a high level, ictVoIP Box provides:
Automated PBX Onboarding – Creates a FusionPBX tenant/domain, admin user, and a starter set of extensions as part of checkout.
Provider-Driven SIP Trunk Setup – Uses provider credentials and templates to create a SIP trunk and map it to the new tenant.
Template-Based Routing – Applies inbound and outbound route templates so that the main DID and basic outbound calling work out of the box.
Tight Integration with ictVoIP Billing – Uses the same provider, gateway, and destination concepts as the Client Services Admin Area, so later administration can be done from the standard tools.
Installation & Configuration
Installing ictVoIP Box
The ictVoIP Box addon includes the following components:
- 1. Addon Module
Core addon logic and admin interface
Provisioning actions and queue management
AJAX handlers for real-time updates
- 2. Shopping Cart Hooks
Checkout processing integration
Regulatory information collection
Email template merge fields
- 3. Custom Order Form Template
Custom checkout cart for ictVoIP Box products
DID selection interface
Regulatory information forms (Provider 2)
- 4. Provider API Integration
Provider API integration for DID ordering
Account management functions
Rate and inventory retrieval
Installation Steps
Step 1: Install ictVoIP Box Package
Upload the ictVoIP Box installation package provided by ictVoIP Canada
Follow the installation wizard or manual installation instructions provided
Ensure all required components are installed:
Addon module
Shopping cart hooks
Custom order form template
Provider API integration
Step 2: Assign Template to Product Groups
Navigate to Setup → Products/Services → Product Groups
Edit the product group containing ictVoIP Box products
In Order Form Template dropdown, select
ictvoipbox_cartClick Save Changes
All products in this group will now use the custom checkout cart
Step 3: Activate ictVoIP Box Addon
Navigate to Setup → Addon Modules in WHMCS admin
Locate ictVoIP Box in the addon list
Click Activate
Enter your license key
Configure access control:
Select admin roles that can access ictVoIP Box
Recommended: Full Administrator, ictVoIP Admin
Click Save Changes

Initial Configuration
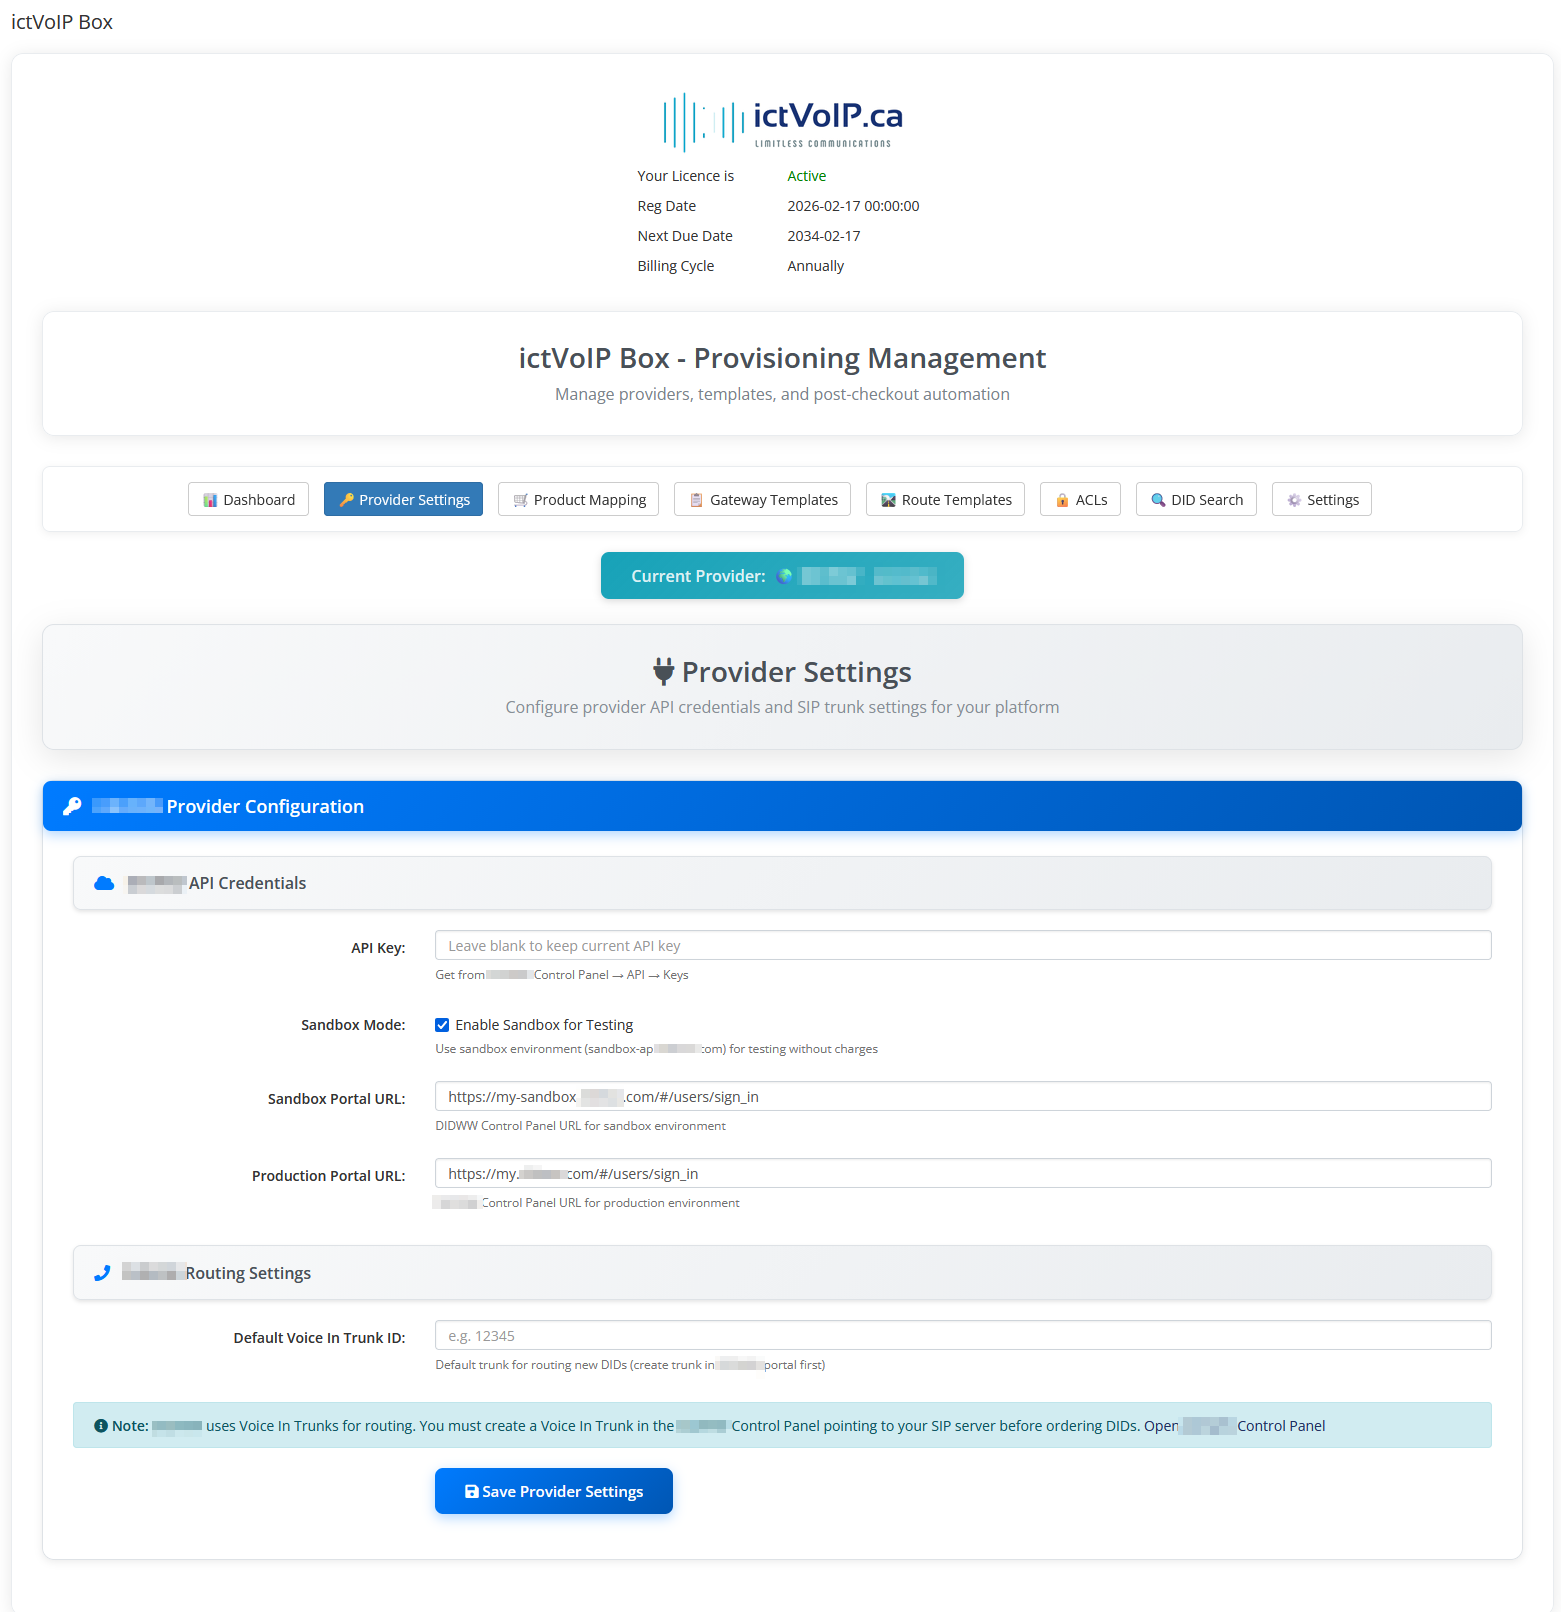
Configure Provider Credentials
Navigate to Addons → ictVoIP Box → Provider Settings tab
Each provider has different configuration fields for API authentication:
- Provider 1 Configuration:
API Username: Your Provider 1 API username
API Password: Your Provider 1 API password
Account Number: Your Provider 1 main account number
Sandbox Mode: Optional (Provider 1 supports both sandbox and production)
Status: Production-ready (can be used for live orders)
- Provider 2 Configuration:
API Key: Your Provider 2 API key
Sandbox Mode: ⚠️ MUST be enabled (sandbox only until fully tested)
Portal URL: Provider 2 portal URL for document uploads (sandbox URL)
Status: Alpha testing only - do not use production API key
Warning
Use sandbox mode for Provider 2 until production testing is complete. Provider 1 can be configured for production use.
Important
Each provider’s settings are independent
API credentials are encrypted in database
Test connectivity after saving credentials
Create WHMCS Products
Navigate to Setup → Products/Services → Products/Services
Create products for:
Provider 1 DIDs: Link to Provider 1
Provider 2 DIDs: Link to Provider 2
Extension Packages: Additional extensions (seats)
Feature Add-ons: Call recording, etc.
- Product Configuration:
Module:
ictvoipboxProduct Type:
OtherNumber of Seats: based on per product config
Product Mapping Configuration
Overview
Navigate to Addons → ictVoIP Box → Product Mappings tab
Product mapping links WHMCS products and bundles to providers (Provider 1 or Provider 2). This determines which provider’s API and settings are used during checkout and provisioning.
How Product Mapping Works:
When a customer orders a product:
System checks product mapping to determine provider
Checkout uses provider-specific settings (DID countries, rates, regulatory requirements)
Order is queued for provisioning with correct provider
Admin provisions using provider’s API
Mapping Priority (Highest to Lowest):
Product Group Mapping - All standalone products in group assigned to same provider
Individual Product Mapping - Specific product assigned to provider
Bundle Mapping - Bundle and all constituent products assigned to provider
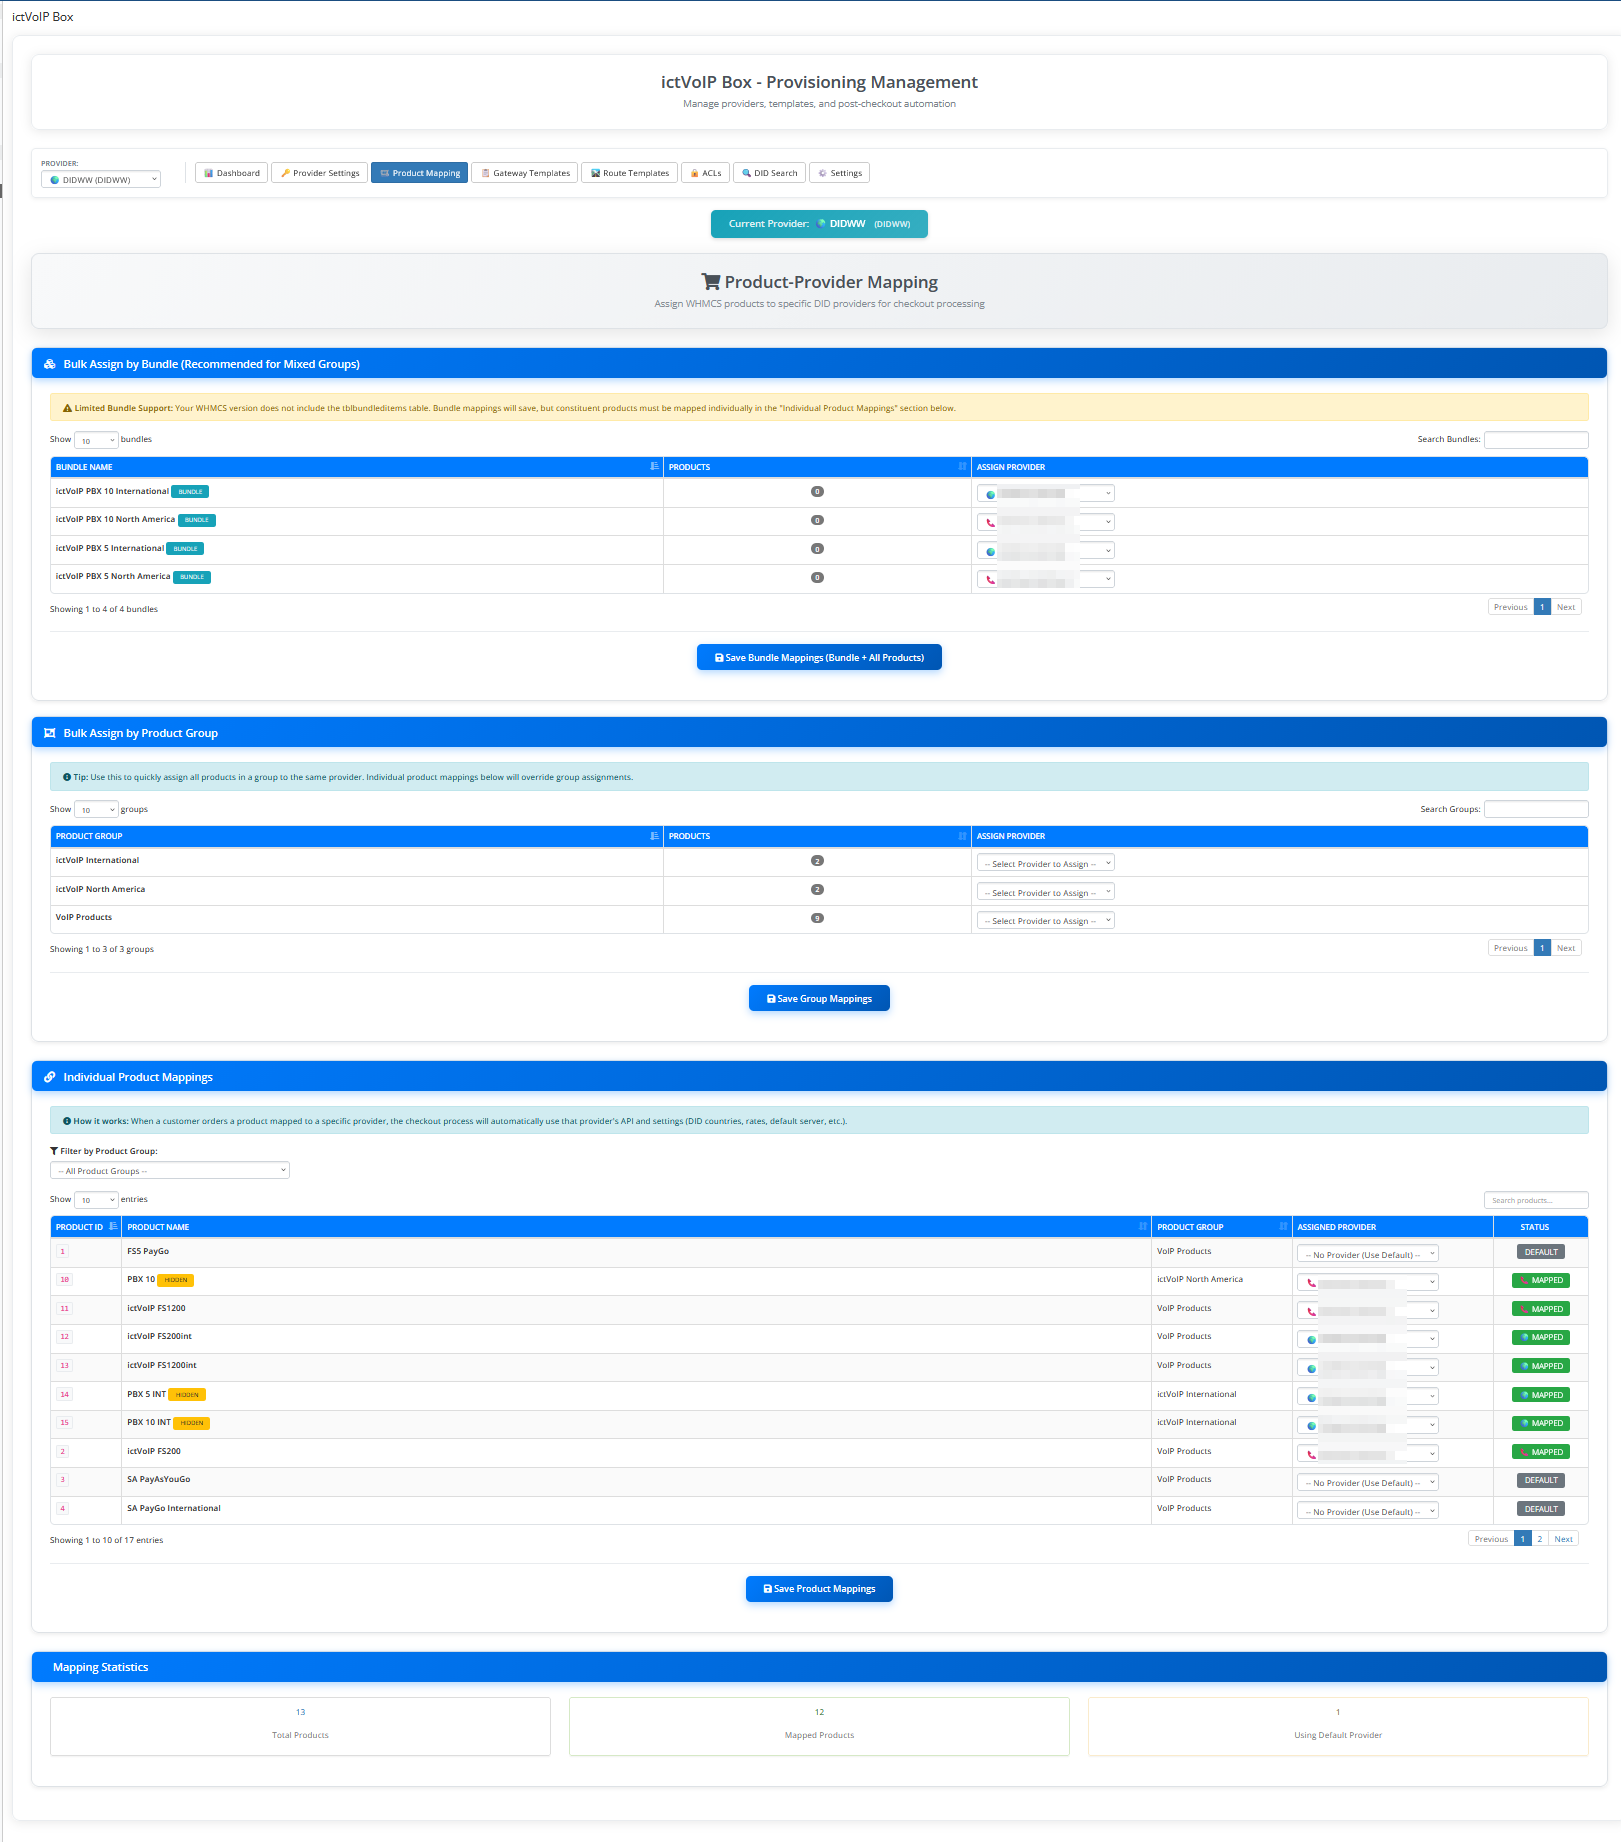
Three Mapping Methods
Method 1: Bulk Assign by Bundle
Recommended for Mixed Groups
Use this to assign a bundle and ALL its constituent products to the same provider, even if products are spread across multiple product groups.
Steps:
Locate bundle in “Bulk Assign by Bundle” section
Select provider from dropdown (Provider 1 or Provider 2)
Click “Save Bundle Mappings”
System maps bundle + all products within bundle
When to Use:
Bundle contains products from multiple product groups
Want all bundle products to use same provider
Simplifies management of complex bundles
Example:
Bundle: “Complete PBX Package”
Contains: US DID (Group A) + Extensions (Group B) + Features (Group C)
Map bundle to Provider 1 → All 3 products use Provider 1
Method 2: Bulk Assign by Product Group
Use this to quickly assign all standalone products in a product group to the same provider.
Steps:
Locate product group in “Bulk Assign by Product Group” section
Select provider from dropdown (Provider 1 or Provider 2)
Click “Save Group Mappings”
System maps all standalone products in group (excludes bundle products)
When to Use:
All products in group should use same provider
Products are not part of bundles
Quick bulk assignment needed
Note
Only affects standalone products (not products within bundles). Bundle products must be mapped via bundle or individual mapping.
Example:
Product Group: “Domestic DIDs”
Contains: US DID, CA DID, UK DID (all standalone)
Map group to Provider 1 → All 3 DIDs use Provider 1
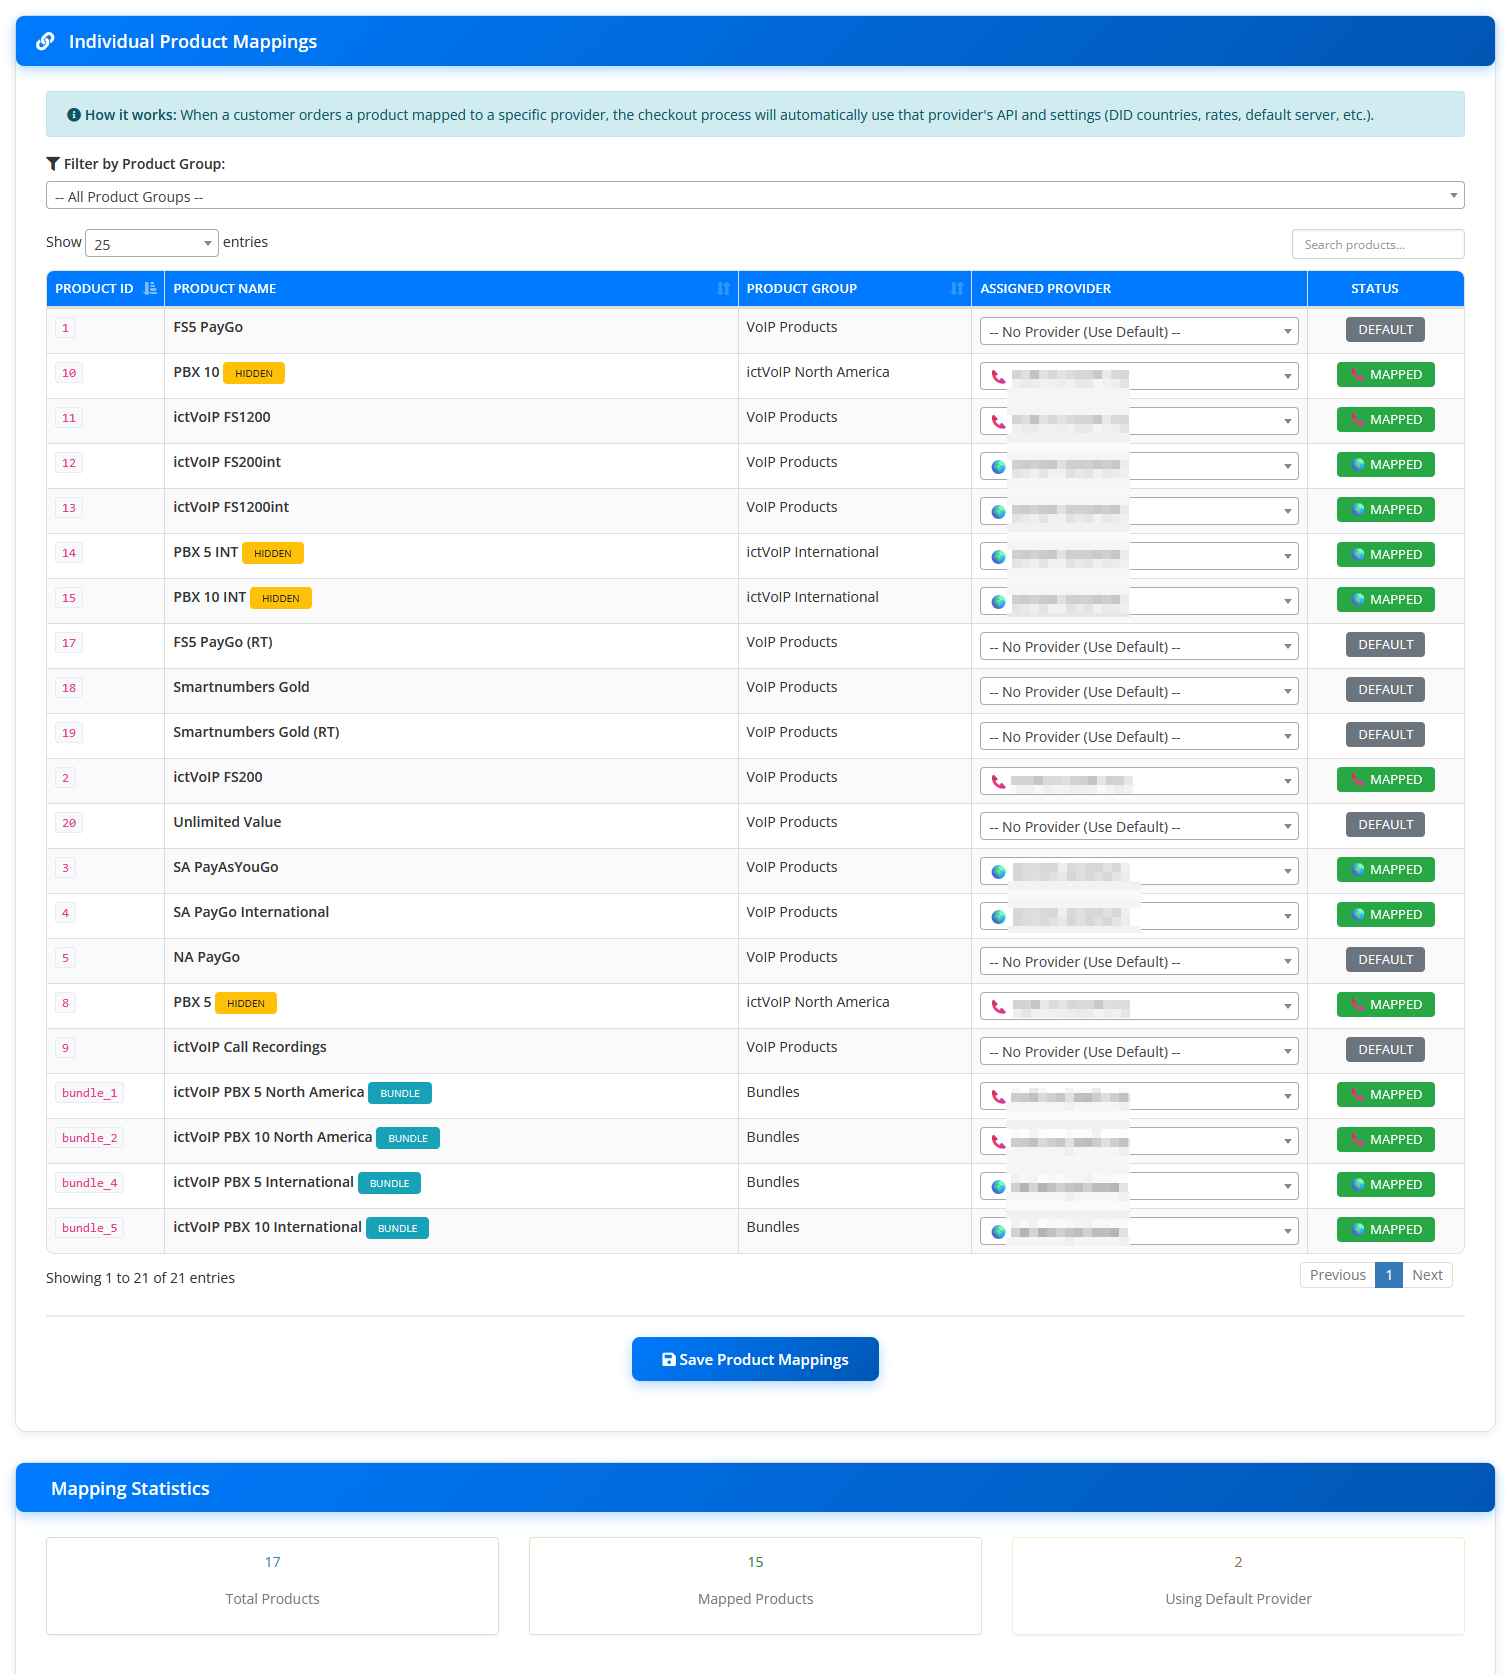
Method 3: Individual Product Mappings
Use this for granular control over individual products and bundles.
Steps:
Use filter dropdown to select product group or “Bundles”
Locate product/bundle in DataTable
Select provider from dropdown in “Assigned Provider” column
Click “Save Product Mappings”
DataTable Columns:
Product ID: WHMCS product ID or
bundle_Xfor bundlesProduct Name: Product/bundle name with indicators (HIDDEN, BUNDLE)
Product Group: Product group name or “Bundles”
Assigned Provider: Dropdown to select Provider 1, Provider 2, or “No Provider (Use Default)”
Status: Badge showing mapping status (Default, Mapped, Invalid)
Status Badges:
Default (gray): No provider assigned
Mapped (green): Assigned to Provider 1
Mapped (green): Assigned to Provider 2
Invalid (yellow): Provider ID invalid (provider deleted)
When to Use:
Override group mapping for specific product
Map individual products not in groups
Fine-tune provider assignments
Map bundles individually
Critical Requirements
Danger
IMPORTANT: Products without mapping will NOT function within the ictVoIP Box framework:
Will NOT be recognized by the ictVoIP Box system
Will NOT be part of checkout process for provisioning
Will NOT trigger DID selection or regulatory forms
Will FAIL order validation and provisioning
Only select products created specifically for ictVoIP Box use
Every product intended for ictVoIP Box MUST be mapped to a provider (Provider 1 or Provider 2). Products without provider mapping are invisible to the ictVoIP Box framework and cannot be provisioned.
Best Practices
✅ Recommended Practices:
Use bundle mapping for bundles with products across multiple groups
Use group mapping for simple product groups
Use individual mapping for exceptions and overrides
Verify mappings after bulk operations
Test checkout after mapping changes
Provider Selection Guidelines:
- Provider 1 Products:
US and Canadian DIDs
Non-regulatory countries
Production-ready (sandbox or live)
- Provider 2 Products:
International DIDs (South Africa, EU, UK, etc.)
Regulatory countries requiring verification
⚠️ Sandbox mode only during alpha testing
Do not use production API key yet
Client Checkout Experience
Provisioning Methods
ictVoIP Box supports three provisioning methods, all controlled by administrators or client checkout:
1. Client Portal Orders
Clients place orders through the WHMCS client area using the 4-step checkout wizard. Orders enter pending state and await admin approval before provisioning.
Access: Client area shopping cart
Flow: Complete 4-step wizard → Order placed → Admin reviews → Admin provisions
Use Case: Standard customer self-service ordering
2. Admin Order Placement
Administrators can place orders directly from the WHMCS admin area on behalf of clients, with immediate access to provisioning controls.
Access: WHMCS Admin → Orders → Add New Order
Flow: Select client → Add product → Complete wizard → Immediate provisioning access
Use Case: White-glove onboarding, enterprise clients, pre-configured deployments
3. Admin Impersonation
Administrators can impersonate a client account to place orders with the client’s context, useful for quick turnaround provisioning or assisted onboarding.
Access: WHMCS Admin → Clients → Login as Client
Flow: Impersonate client → Place order via client portal → Return to admin → Provision
Use Case: Support-assisted ordering, troubleshooting checkout issues, client training
All three methods result in the same automated provisioning sequence once the administrator confirms the order.
Checkout Wizard Flow
The ictVoIP Box checkout wizard guides clients (or administrators placing orders) through a streamlined 4-step process to configure their new PBX service. The wizard dynamically adapts based on the selected provider and regulatory requirements.
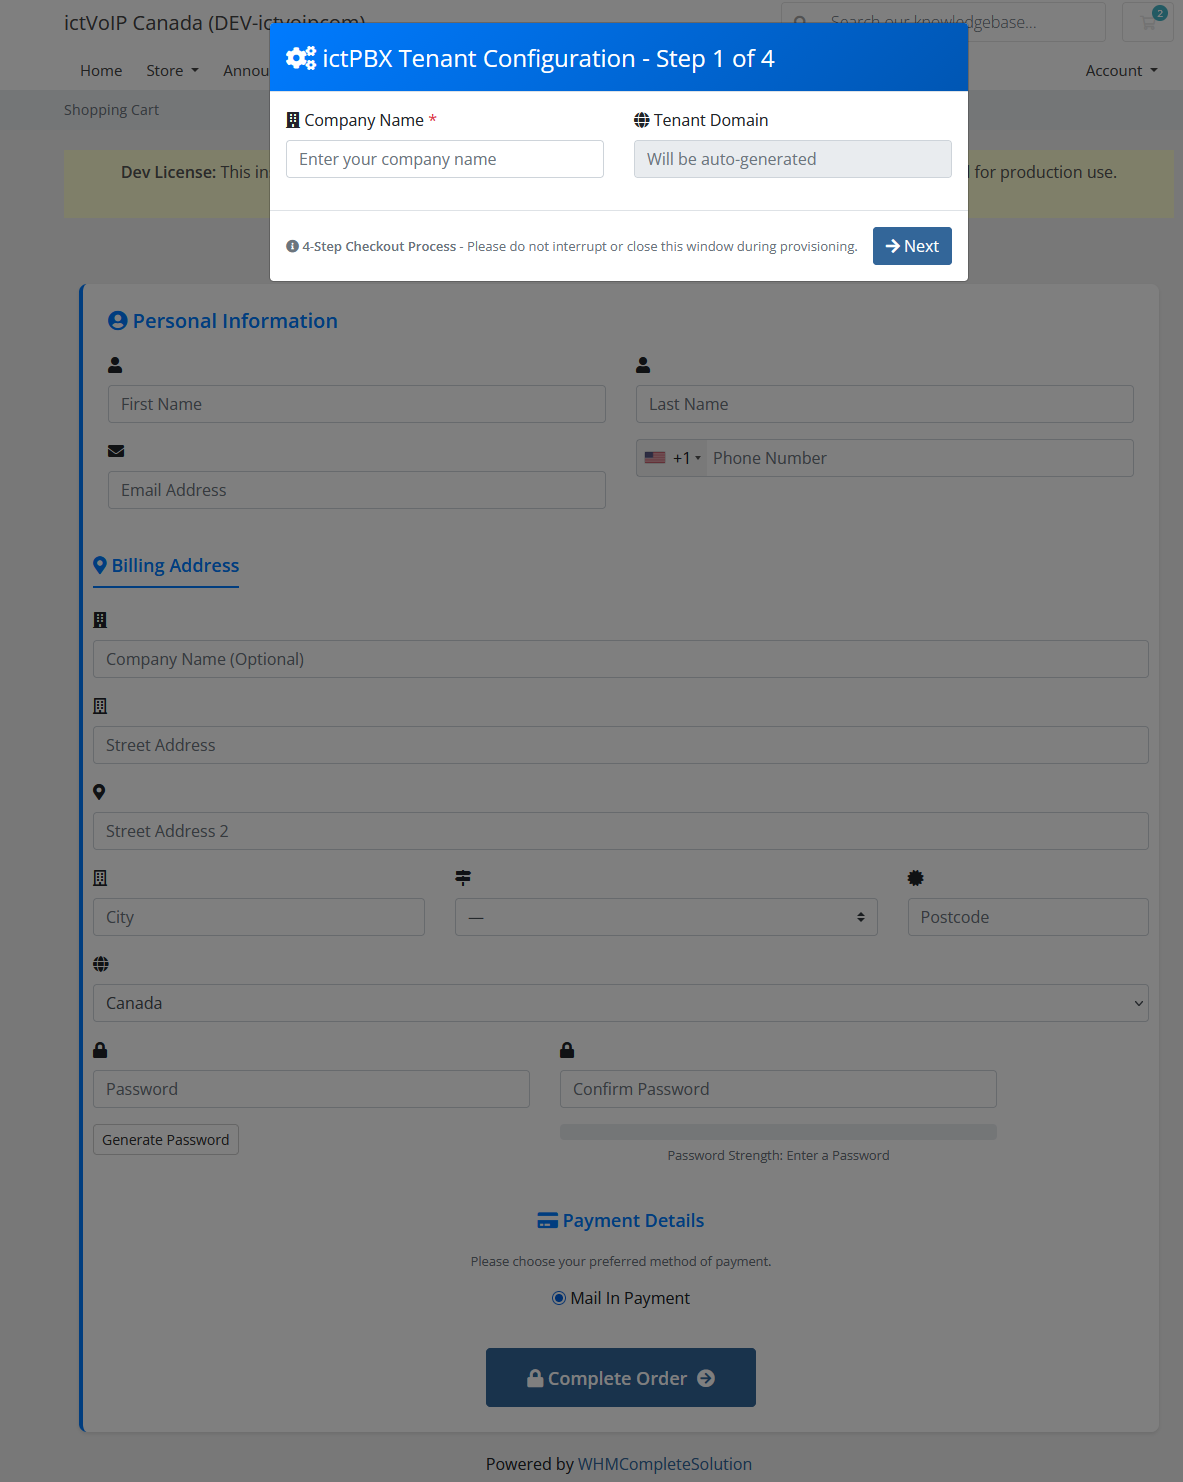
Step 1: Company Details
Purpose: Collect tenant identification and contact information
The first step captures essential company information that will be used to create the FusionPBX tenant domain and admin user account.
Fields Collected:
Company Name: Used to generate tenant domain (e.g.,
acmecorp.pbx.example.com)Contact Name: Primary contact for the PBX service
Contact Email: Admin user email for credentials and notifications
Contact Phone: Support contact number
Validation:
All fields are required
Company name must be unique (no duplicate tenant domains)
Email must be valid format
Phone number must be valid format
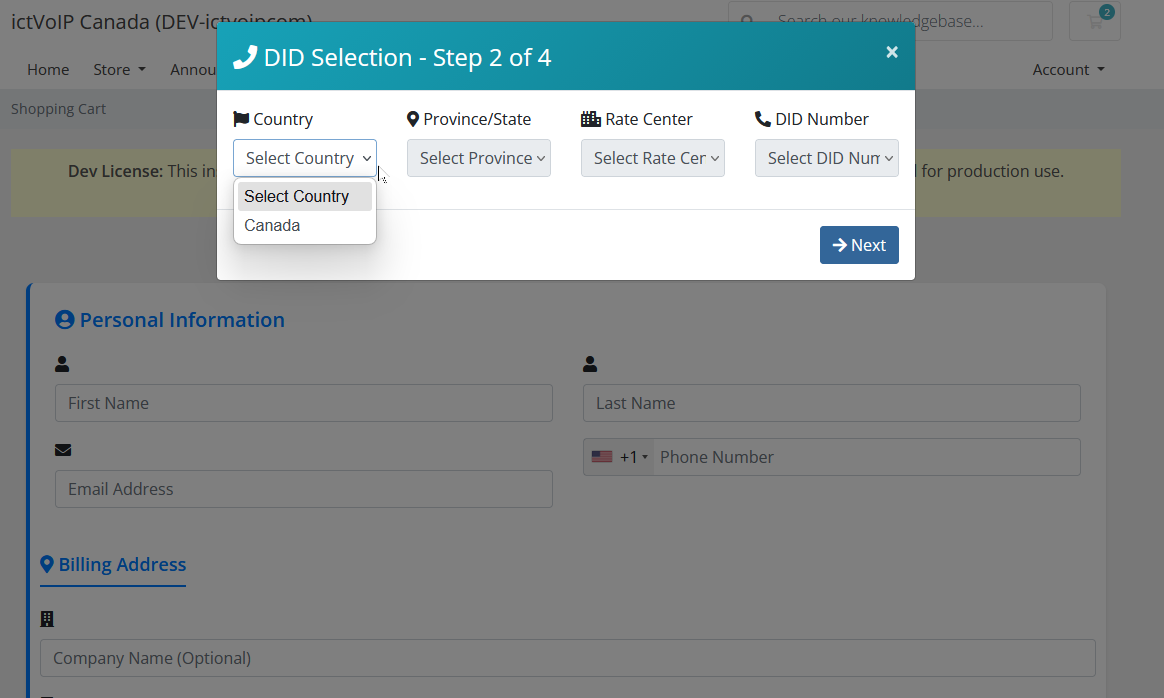
Step 2: DID Selection
Purpose: Select primary phone number for the PBX service
The second step presents available DIDs based on the product’s mapped provider (Provider 1 or Provider 2). Clients can search and filter by country, region, rate center, and specific number patterns.
Search Filters:
Country: Select from available countries
Province/State: Filter by province or state (if applicable)
Rate Center: Filter by rate center or city
Number Pattern: Search for specific number patterns (e.g.,
*555*)
DID Display:
Number: Full E.164 formatted number
Location: City, state/province, country
Monthly Rate: Recurring monthly cost
Setup Fee: One-time activation fee (if applicable)
Actions:
Click “Select” to choose DID and proceed
Search and filter to find desired number
View pricing before selection
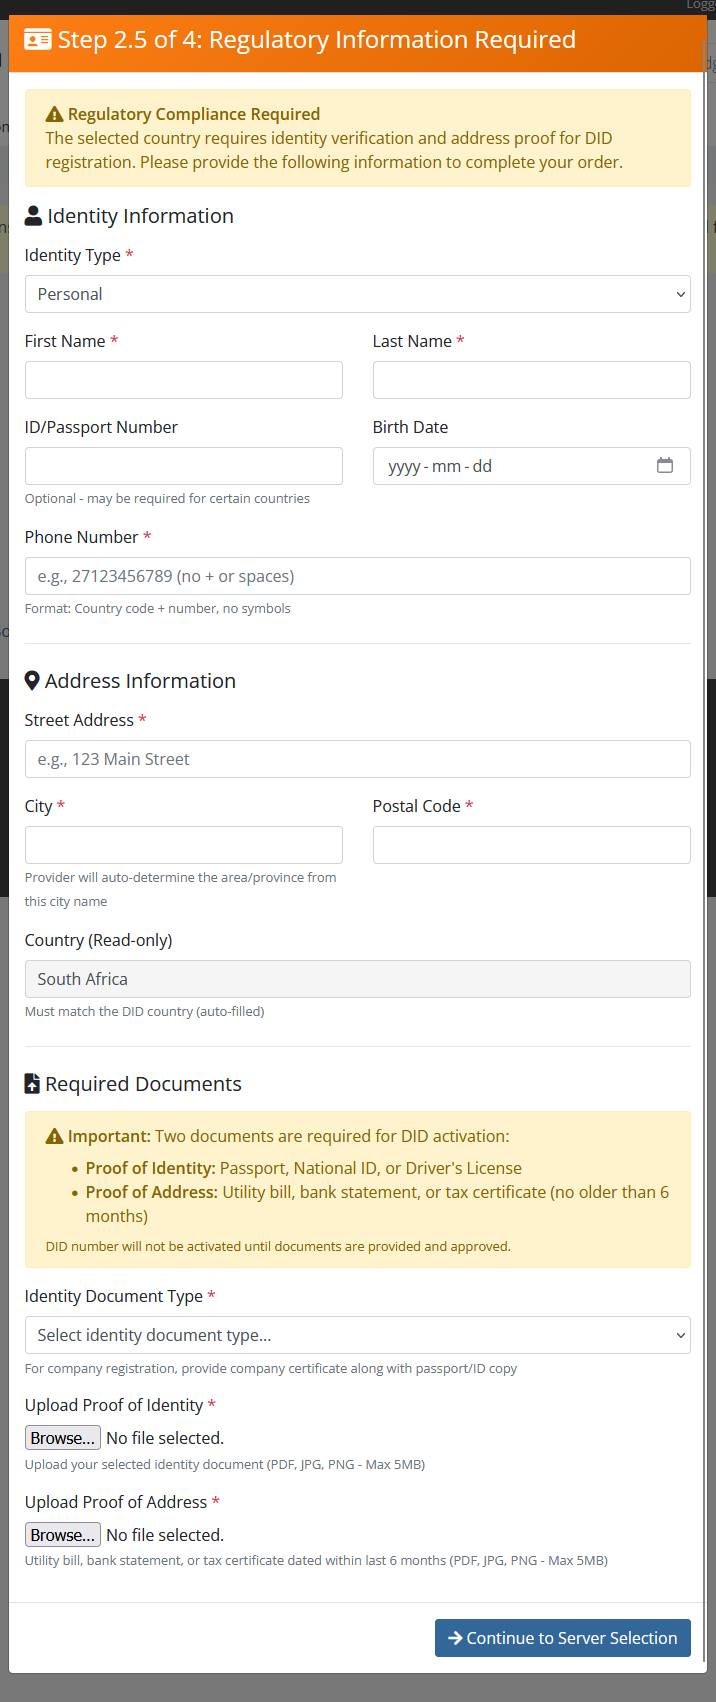
Step 2.5: Regulatory Compliance
Purpose: Collect regulatory information for Providers
Important
This step only appears for Provider products that require regulatory compliance (e.g., South Africa, EU countries, UK). if normal DID ordering we skip directly to Step 3.
When a Provider DID is selected, the wizard presents a regulatory compliance form to collect identity, address, and business information required by the provider.
Identity Information:
Full Name: Legal name matching government-issued ID
Date of Birth: Format: YYYY-MM-DD
Phone Number: Contact phone number
Email Address: Contact email address
Address Information:
Country: Select from regulatory countries
City: City name (used to auto-match regulatory area)
Postal Code: ZIP or postal code
Street Address: Complete street address
Business Information (For Business DIDs):
Company Name: Legal business name
Registration Number: Business registration number
Tax ID: Tax identification number or VAT number
Document Upload Requirements:
The form displays required documents that must be uploaded during admin review:
Proof of Identity: Passport, national ID, or driver’s license
Proof of Address: Utility bill, bank statement (within 3 months)
Business Proof: Company registration, tax certificate (for business DIDs)
Warning
Document Upload Timing:
Documents are NOT uploaded during client checkout. The client provides regulatory information in this step, and the administrator uploads proof documents during the admin review process (see document-upload-phase).
Validation:
All required fields must be completed
Date of birth must be valid date
City name must match Provider 2 regulatory areas
Business fields required only for business DID types
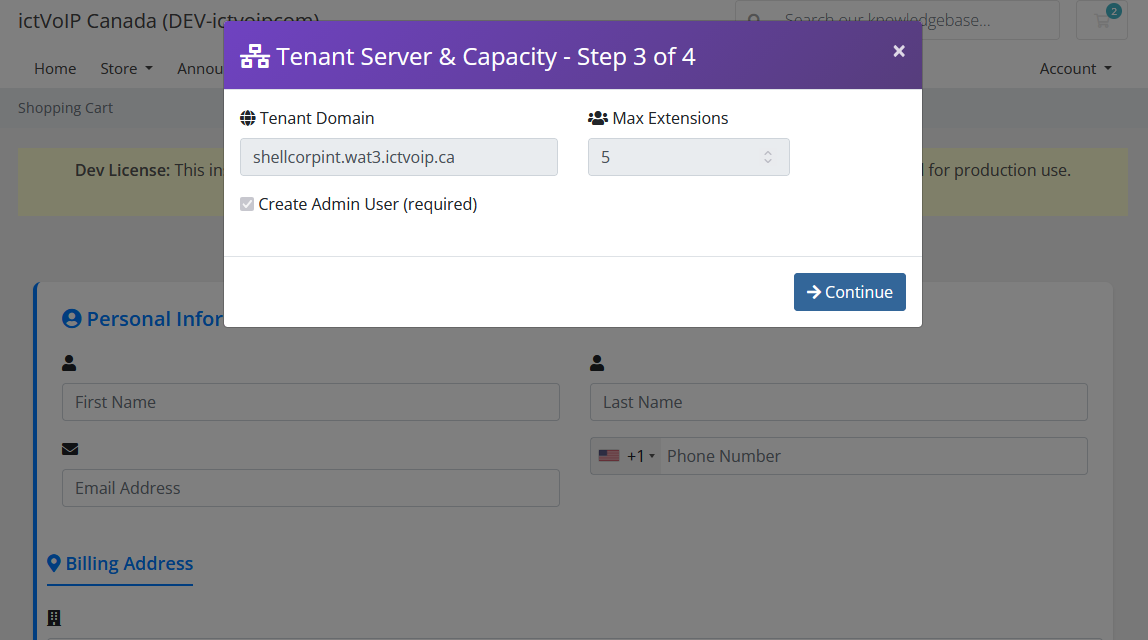
Step 3: Tenant & Extensions Preview
Purpose: Review tenant configuration and extension allocation
The third step displays a summary of the PBX tenant that will be created, including the tenant domain, FusionPBX server assignment, and the number of extensions (seats) included with the selected product.
Tenant Configuration:
Tenant Domain: Auto-generated from company name (e.g.,
acmecorp.pbx.example.com)FusionPBX Server: Assigned server from product mapping
Max Seats: Number of extensions included in the product bundle
Extension Preview:
Included Extensions: Number of seats from product bundle quantity
Extension Range: Preview of extension numbers (e.g.,
1001-1010for 10 seats)Billing: Monthly recurring cost per seat (if applicable)
Editable Fields:
Tenant Domain: Can be customized if desired (must remain unique)
Actions:
Review configuration
Edit tenant domain if needed
Proceed to admin user creation
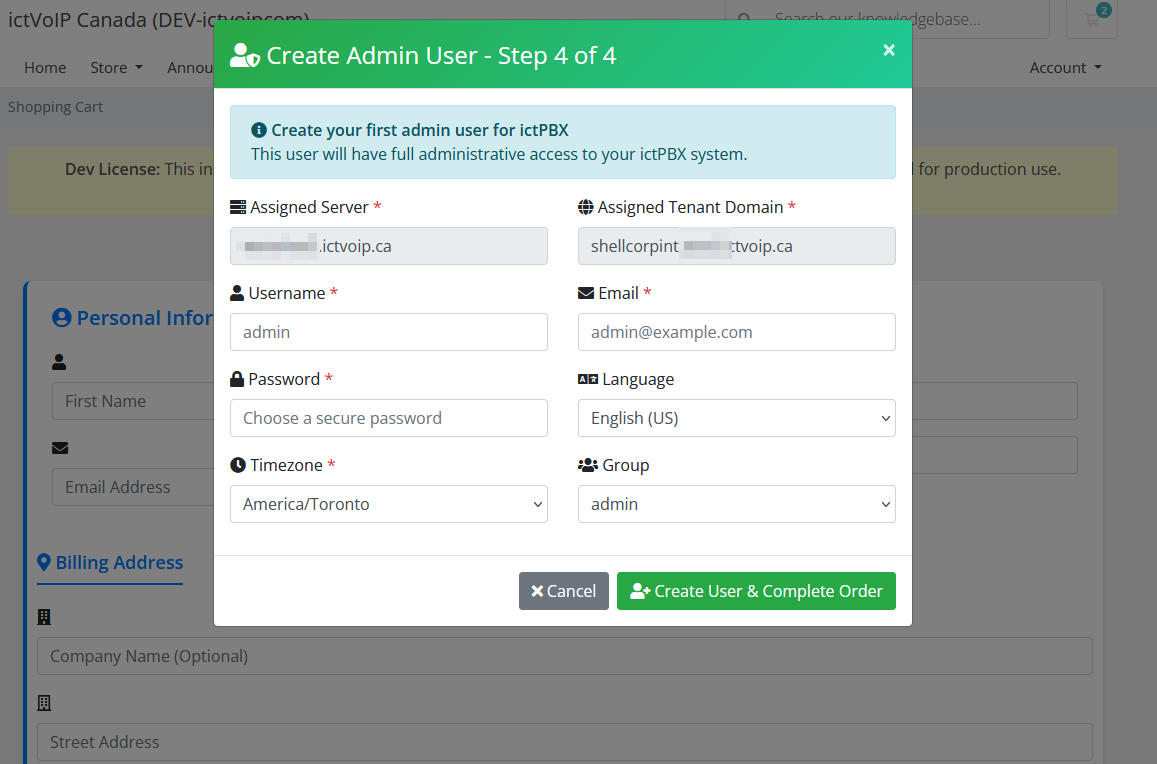
Step 4: Create Admin User
Purpose: Configure admin user credentials for FusionPBX access
The final step collects admin user details that will be used to create the primary administrator account on the FusionPBX tenant.
Admin User Configuration:
Username: Admin login username (default:
admin, can be customized)Password: Strong password for admin account
Confirm Password: Password confirmation
Email: Admin email for notifications (pre-filled from Step 1)
Timezone: Tenant timezone for call logs and scheduling
Language: Interface language (default: English)
Group: User group assignment (default:
superadmin)
Password Requirements:
Minimum 8 characters
Must contain uppercase and lowercase letters
Must contain at least one number
Special characters recommended
Server Assignment Display:
FusionPBX Server: Displays assigned server from product mapping
Tenant Domain: Displays final tenant domain from Step 3
Actions:
Click “Create User & Complete Order” to submit order
Order is placed in pending state for admin review
Client receives order confirmation email
Post-Checkout Order Status
After completing the checkout wizard, the order is placed in a pending provisioning state. The client receives an order confirmation email and can view the order status in their client area.
Client View:
Order appears in My Orders with status
PendingOrder details show selected DID, tenant domain, and product information
Client cannot modify order after submission
Admin View:
Order appears in Provisioning Queue (see admin-queue-management)
Admin can review order details and regulatory information
Admin controls when provisioning begins
Next Steps:
Administrator reviews order in provisioning queue
For Provider 2 orders, administrator completes regulatory workflow
Administrator triggers provisioning when ready
Client receives welcome email with credentials upon completion
Provisioning Workflows
Provisioning (Standard)
Timeline: Admin-initiated (typically 5-15 minutes)
Client Orders Provider DID through shopping cart
Order Created in provisioning database
Admin Queue displays order with status
PendingAdmin Reviews order in provisioning queue
Admin Clicks “Provision” button
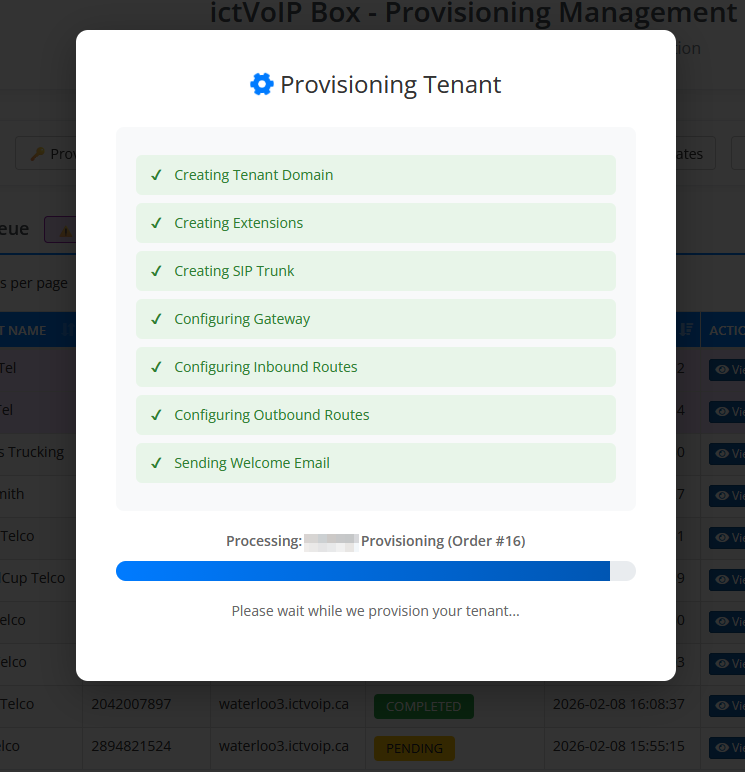
System Executes:
Creates/verifies FusionPBX tenant domain
Creates admin user with credentials
Provisions extensions
Configures Provider SIP gateway
Creates inbound route for DID
Creates outbound route
Sends welcome email with credentials
Status Updated to
Completed
Admin Actions Required:
Review order details
Click “Provision” button
Verify provisioning success
Gateway Configuration:
SIP username from Provider credentials
SIP password from Provider credentials
Proxy:
{location}.provider1.example(e.g.,toronto.provider1.example)Port: 5060 (UDP) or 5061 (TLS)
Provider Provisioning (Regulatory)
Timeline: 1-5 business days (due to Provider 2 verification)
Provider requires regulatory compliance for certain countries. The provisioning process includes identity verification and document upload.
Phase 1: Order Review
Client Orders Provider DID with regulatory information
Order Created in pending orders database
Status:
pending_reviewQueue Display: Purple/lavender highlight with ⚠️ badge
Admin Actions:
Click “View” to review regulatory details
Verify client-provided information (identity, address, business)
Proceed to Phase 2
Phase 2: Submit Identity to Provider
Admin Clicks “Submit to Provider” button
System Executes:
Creates Provider Identity resource via API
Creates Provider Address resource via API
Links address to identity
Stores
provider2_identity_idandprovider2_address_id
Status:
identity_address_confirmedQueue Display: ✅ badge “Identity Confirmed - Upload Proofs”
Admin Actions:
Click “Submit to Provider”
Wait for API response
Proceed to Phase 3
Phase 3: Upload Proof Documents
Admin Clicks “Upload Proofs to Provider” button
System Opens Provider portal in new tab
Admin Uploads documents in Provider portal:
Proof of Identity (passport, ID, driver’s license)
Proof of Address (utility bill, bank statement within 3 months)
Business Proof (company registration, tax certificate)
Admin Returns to ictVoIP Box and clicks “Mark Docs Uploaded”
Status:
documents_uploadedQueue Display: 📤 badge “Docs Uploaded to Provider”
Admin Actions:
Click “Upload Proofs to Provider”
Upload documents in Provider portal
Return to ictVoIP Box
Click “Mark Docs Uploaded”
Proceed to Phase 4

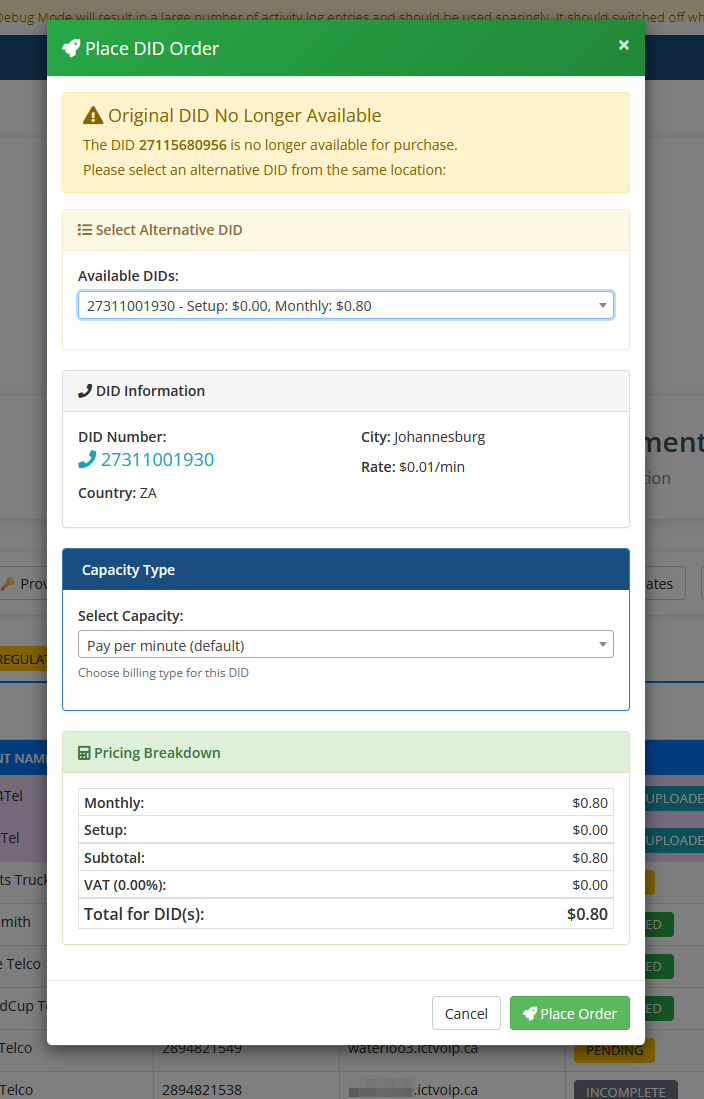
Phase 4: Place DID Order
Admin Clicks “Place Order” button and the DID Ordering Modal appears.
DID Ordering Modal
The DID ordering modal provides a final opportunity to verify or change the selected DID before submitting the order to the provider. This is critical because the originally selected DID may no longer be available.
Modal Sections:
1. Original DID Availability Check
System checks if originally selected DID is still available
If unavailable, displays warning: “Original DID No Longer Available”
Shows original DID number and message to select alternative
2. Select Alternative DID
Available DIDs dropdown displays DIDs from same location
Format:
[DID Number] - Setup: $X.XX, Monthly: $X.XXSelect from dropdown to choose alternative DID
DID information updates automatically when selection changes
3. DID Information Display
DID Number: Selected number with clickable link
City: Location/rate center
Country: Country code (e.g., ZA for South Africa)
Rate: Per-minute rate for calls (e.g., $0.01/min)
4. Capacity Type Selection
Select Capacity dropdown
Options:
Pay per minute (default) - Metered billing
Unlimited - Flat-rate unlimited calling (if available)
Custom capacity plans (provider-specific)
Billing type determines how DID usage is charged
5. Pricing Breakdown
Monthly: Recurring monthly DID fee
Setup: One-time activation fee
Subtotal: Monthly + Setup
VAT: Tax amount (if applicable)
Total for DID(s): Final total cost
Modal Actions:
Cancel: Close modal without ordering
Place Order: Submit order to provider API
After Clicking “Place Order”:
System Executes:
Creates Provider Proof resource
Creates Provider DID Order via API
Links order to verified identity and address
Stores
provider2_order_id
Status:
order_placedQueue Display: ⏳ badge “Awaiting Provider”
Admin Actions:
Click “Place Order” to open modal
Verify DID availability or select alternative
Choose capacity type (pay per minute or unlimited)
Review pricing breakdown
Click “Place Order” in modal to submit
Wait for API response
Proceed to Phase 5 (monitoring)
Phase 5: Monitor Provider 2 Order Status
Admin Periodically Clicks “Check Provider Status” button
System Polls Provider API for order status
Possible Statuses:
awaiting_registration: Provider processing (⏳ badge)blocked: Order blocked (⛔ badge - contact Provider support)terminated: Order terminated (🛑 badge - contact Provider support)active: Order approved (✅ badge “Provider Active - Ready to Sync”)
Admin Actions:
Check status daily during business hours
If blocked/terminated, contact Provider support
When status is
active, proceed to Phase 6
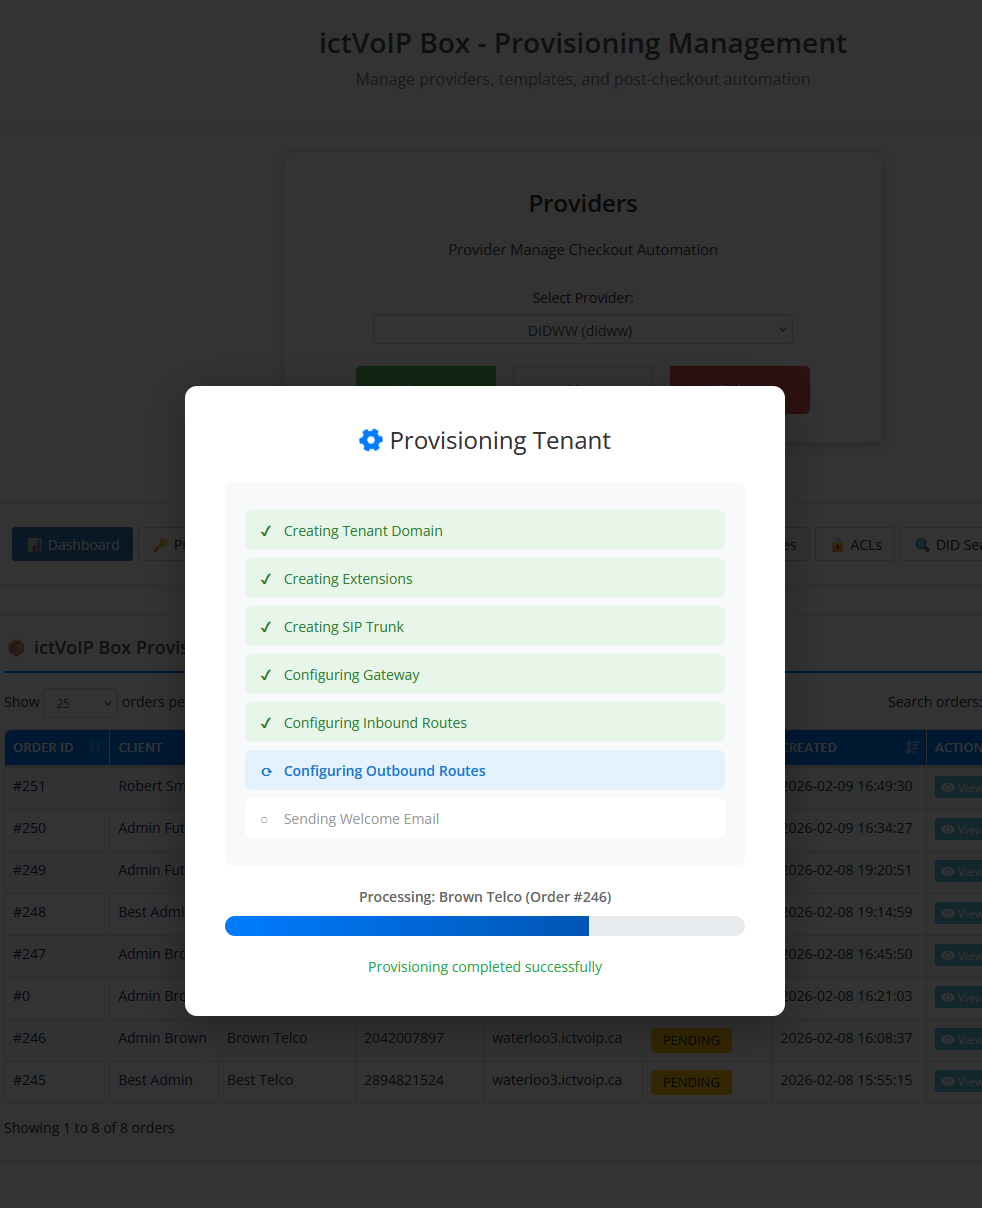
Phase 6: Sync DID and Provision to FusionPBX
Admin Clicks “Provision to FusionPBX” button
System Executes:
Retrieves Provider trunk credentials
Creates FusionPBX tenant domain
Creates admin user
Provisions extensions
Configures Provider SIP gateway
Creates inbound route for DID
Creates outbound route
Sends welcome email with credentials
Status:
completedQueue Display: ✅ badge “Completed”
Gateway Configuration:
SIP username from Provider trunk credentials
SIP password from Provider trunk credentials
Proxy:
out.provider2.example(default, can be overridden in template)Port: 5060 (UDP) or 5061 (TLS)
Admin Queue Management
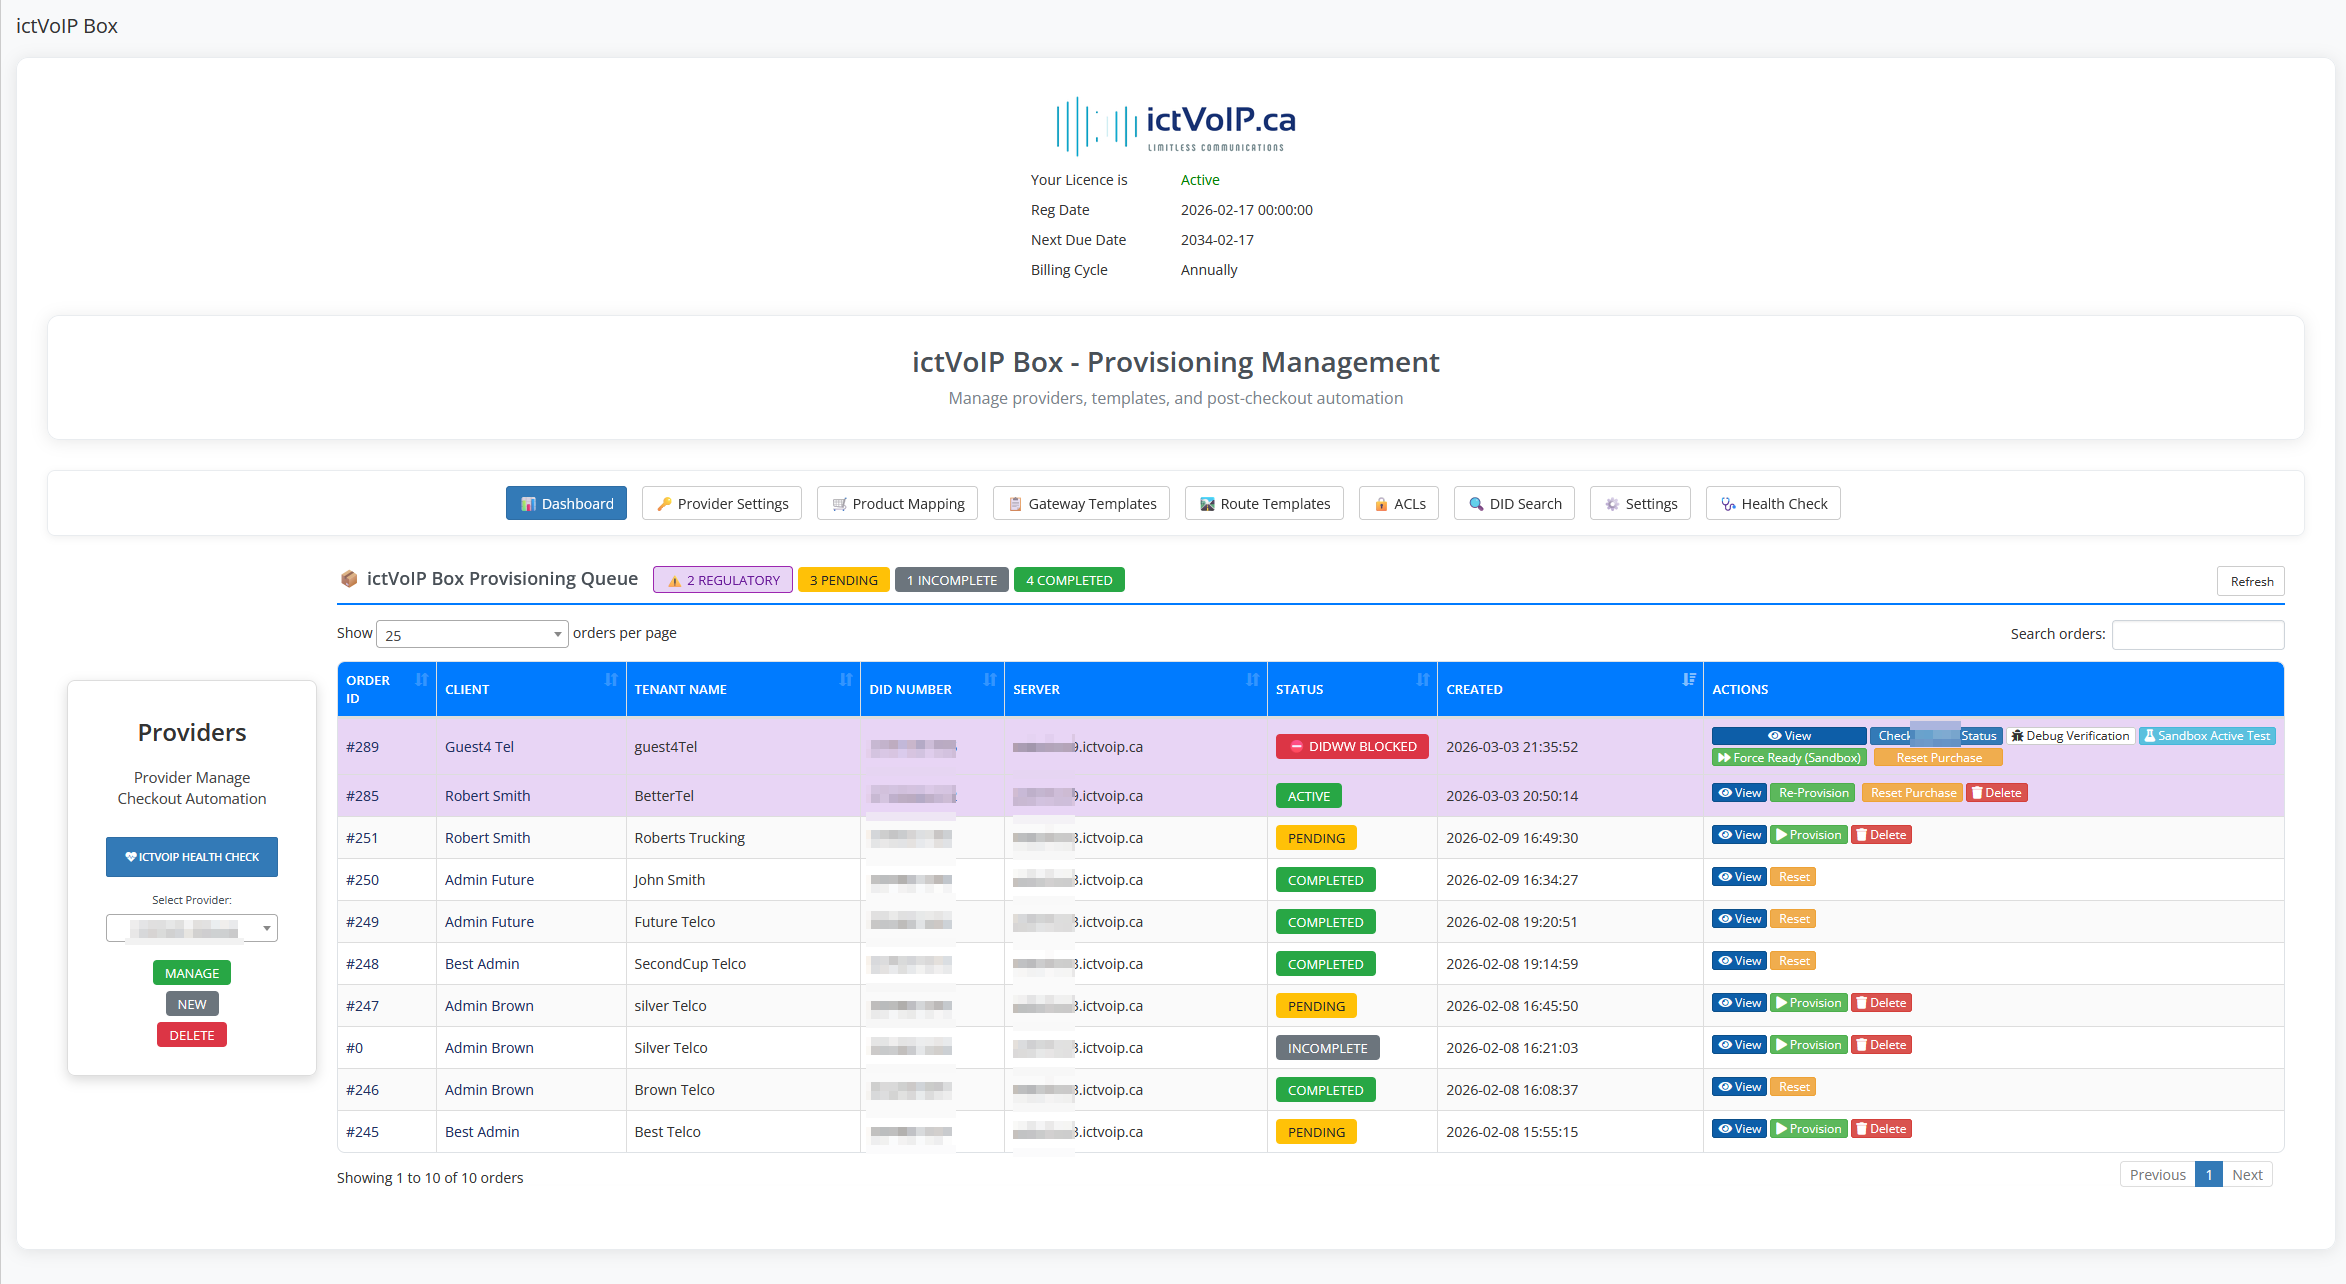
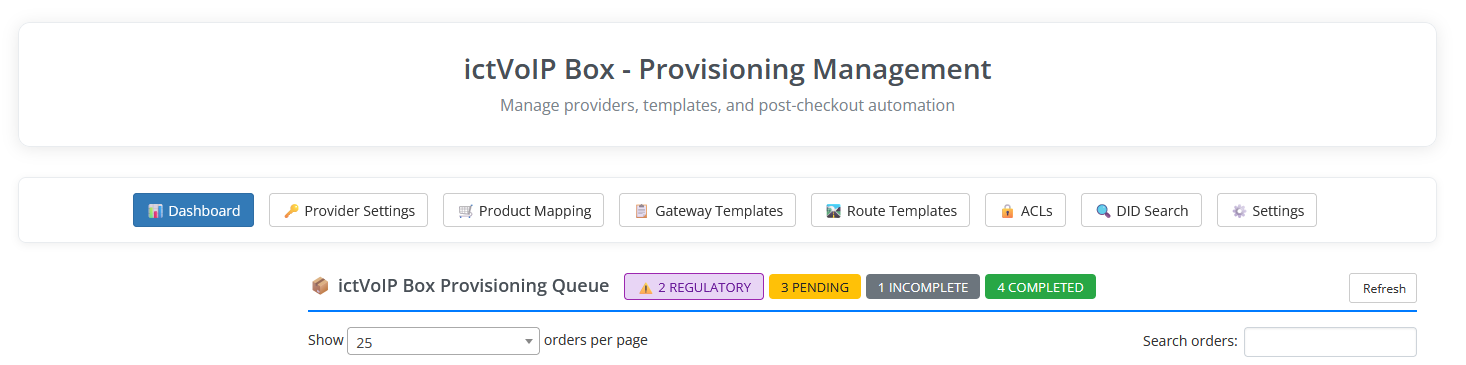
Provisioning Queue Interface
Navigate to Addons → ictVoIP Box → Provisioning Queue
The provisioning queue displays all pending, in-progress, and completed orders. Administrators can review order details, manage provisioning workflows, and monitor status.
Queue Columns:
Order ID: WHMCS order identifier
Client: Client name and contact information
Product: Product/bundle ordered
Provider: Provider 1 or Provider 2
DID: Selected phone number
Status: Current provisioning status with badge
Actions: Available admin actions based on status
Status Badges:
Pending (blue): Awaiting admin review
In Progress (yellow): Provisioning in progress
Identity Confirmed (green): Provider identity submitted
Docs Uploaded (purple): Documents uploaded to Provider
Awaiting Provider (orange): Waiting for Provider verification
Active (green): Provider order approved, ready to provision
Completed (green): Fully provisioned
Failed (red): Provisioning error
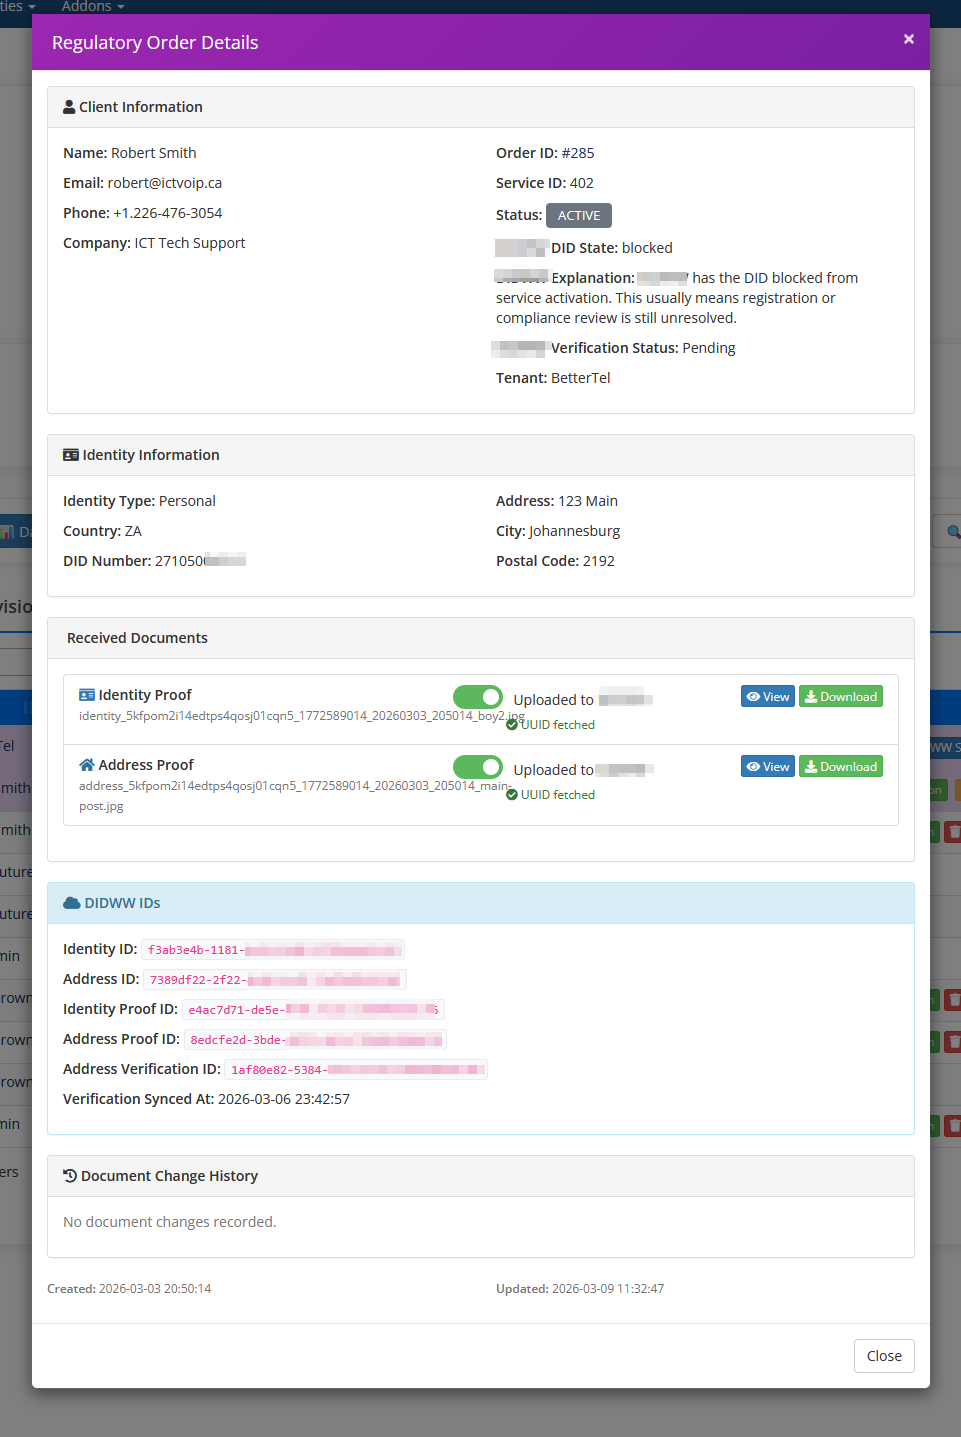
Regulatory Data Review
For Provider 2 orders, administrators must review regulatory information before submission.
Regulatory Details Modal:
Click “View” button for Provider order
Review sections:
Identity Information: Name, date of birth, phone, email
Address Information: Country, city, postal code, street address
Business Information: Company name, registration number, tax ID
Verify information is complete and accurate
Check for common issues:
Missing required fields
Invalid date formats
Incomplete addresses
Mismatched business information
If Information is Incomplete:
Contact client via support ticket
Request corrected information
Update order notes with issue details
Do not proceed to Provider 2 submission until corrected
If Information is Complete:
Proceed to submit identity to Provider
Document Upload Requirements
Provider 2 requires proof documents for regulatory compliance.
Required Documents:
1. Proof of Identity (One of the following):
Government-issued passport (photo page)
National ID card (front and back)
Driver’s license (front and back)
Document Requirements:
Clear, legible scan or photo
All corners visible
No glare or shadows
Color preferred
File format: JPG, PNG, or PDF
Maximum file size: 10MB per document
2. Proof of Address (One of the following, dated within 3 months):
Utility bill (electricity, water, gas)
Bank statement
Lease agreement or rental contract
Government-issued document with address
Document Requirements:
Must show full name matching identity document
Must show complete address matching order
Must be dated within last 3 months
Clear, legible scan or photo
File format: JPG, PNG, or PDF
3. Business Proof (For business DIDs):
Company registration certificate
Business license
Tax registration certificate
VAT registration document
Document Requirements:
Must show company name matching order
Must show registration number
Must be current and valid
Clear, legible scan or photo
File format: JPG, PNG, or PDF
Warning
Common Rejection Reasons:
Document expired or too old
Text not legible
Document corners cut off
Address doesn’t match order information
Name doesn’t match identity information
Business registration doesn’t match company name
Troubleshooting
Common Issues
Provider 2 Identity Submission Fails
Symptoms:
API returns 400 Bad Request error during identity submission
Error message displayed in provisioning queue
Solution:
Contact ictVoIP Canada support with the following information:
Order ID
Client name
Error message displayed
Screenshot of error (if available)
Support will investigate and resolve the issue
Provider 2 Order Stuck in Awaiting Registration
Symptoms:
Order status doesn’t change after several days
No error messages
Solution:
Wait 1-3 business days for Provider 2 manual review
Check Provider 2 portal for verification status
Contact Provider 2 support if > 5 business days
Provider 2 Order Shows Blocked or Terminated
Symptoms:
Order status changes to blocked or terminated
Cannot proceed with provisioning
Solution:
Check Provider 2 portal for rejection reason
Contact Provider 2 support with order details
May need to re-submit with corrected information
Use “Reset Purchase” button to restart from document upload phase
Gateway UUID Not Syncing
Symptoms:
Gateway created successfully but UUID is NULL
DataTables shows “NO” in FPBX column
Solution:
Gateway needs time to fully provision on FusionPBX
Perform manual sync from ictVoIP Billing → Gateways tab
Select tenant/server and click “Sync from FusionPBX”
UUID will be fetched and stored
Note
This is a known limitation during checkout provisioning. Manual sync required post-provisioning.
Maintenance Tasks
Daily Tasks
1. Review Provisioning Queue
Check for pending orders
Provision Provider 1 orders
Monitor Provider 2 regulatory orders
2. Check Provider 2 Order Status
Poll orders in
order_placedstatusFollow up on blocked/terminated orders
3. Verify Welcome Emails
Ensure clients receive credentials
Check email logs for failures
Support & Resources
Documentation
ictVoIP Canada Official Documentation: https://docs.ictvoip.ca
FusionPBX Docs: https://docs.fusionpbx.com
WHMCS Docs: https://docs.whmcs.com
Getting Help
For Platform Issues:
Check WHMCS activity log for errors
Review error messages in provisioning queue
Contact ictVoIP Canada support for assistance
For Provider Issues:
Provider 1 Support: Contact Provider 1 support team
Provider 2 Support: Contact Provider 2 support team
For Module Support:
Contact ictVoIP development team
Submit bug reports: https://ictvoip.ca/resources/beta-bug-report
Include logs and screenshots with all bug reports