Server Management
PBX Server Integration & API Configuration
The Server Management section covers the installation and configuration of PBX server modules, enabling seamless integration between your WHMCS system and various PBX platforms.
Overview
Server modules allow you to provision and manage PBX servers directly from your WHMCS admin panel. This integration provides automated provisioning, billing, and management capabilities for your PBX infrastructure.
Supported PBX Platforms: * FusionPBX 5.3.x * Vodia PBX * Custom PBX integrations
Key Features: * Automated server provisioning * Real-time server status monitoring * Integrated billing and management * API-based communication * Multi-server support
FusionPBX Integration
Supported Versions: * FusionPBX 5.1.x (current) * FusionPBX 5.2.x (current) * FusionPBX 5.3.x (current)
Note
For older version support, please contact our support team.
Package Information:
You may receive a bundled package containing both FusionPBX and WHMCS modules: * Package: ictvoip_fusionPBX_module-release-1.3.x_PHP8.x.zip * Contents: FusionPBX API scripts + WHMCS Server Module * We now offer an install script
FusionPBX API Installation
Step 1: Download and Extract
Download the FusionPBX API package and extract it to your FusionPBX server:
# Extract to FusionPBX root directory
unzip ictvoip_fusionpbx_5-3-x_apis.zip -d /var/www/fusionpbx/
Step 2: Upload Files
Upload the API scripts to your FusionPBX host using WinSCP, FTP, or SCP:
Required file locations:
/var/www/fusionpbx/app/xml_cdr/chkcon.php
/var/www/fusionpbx/app/xml_cdr/export_cdr.php
/var/www/fusionpbx/app/xml_cdr/import_cdr.php
/var/www/fusionpbx/app/xml_cdr/img/
/var/www/fusionpbx/app/xml_cdr/img/loading.gif
Step 3: Verify Installation
Check that all files are properly uploaded and have correct permissions:
# Check file permissions
ls -la /var/www/fusionpbx/app/xml_cdr/

# Verify API accessibility
curl -I https://your-fusionpbx-domain.com/app/xml_cdr/chkcon.php
WHMCS Server Module Installation
Step 1: Download Server Module
Download the WHMCS server module from your client area:
Package: ictvoip_fusionPBX_module-release-1.3.x_PHP8.x.zip
Location: /home/$user/tmp/
Step 2: Extract and Copy Files
Extract the package and copy the required files:
# Extract the package
unzip ictvoip_fusionPBX_module-release-1.3.x_PHP8.x.zip

# Copy WHMCS files
cp -r includes/hooks /home/$user/public_html/includes/
cp -r modules/servers/fusionpbx /home/$user/public_html/modules/servers/
Step 3: Verify Directory Structure
Ensure the following structure exists:
/home/$user/public_html/includes/hooks
/home/$user/public_html/modules/servers/fusionpbx
/home/$user/public_html/modules/servers/fusionpbx/img
/home/$user/public_html/modules/servers/fusionpbx/lib
/home/$user/public_html/modules/servers/fusionpbx/templates
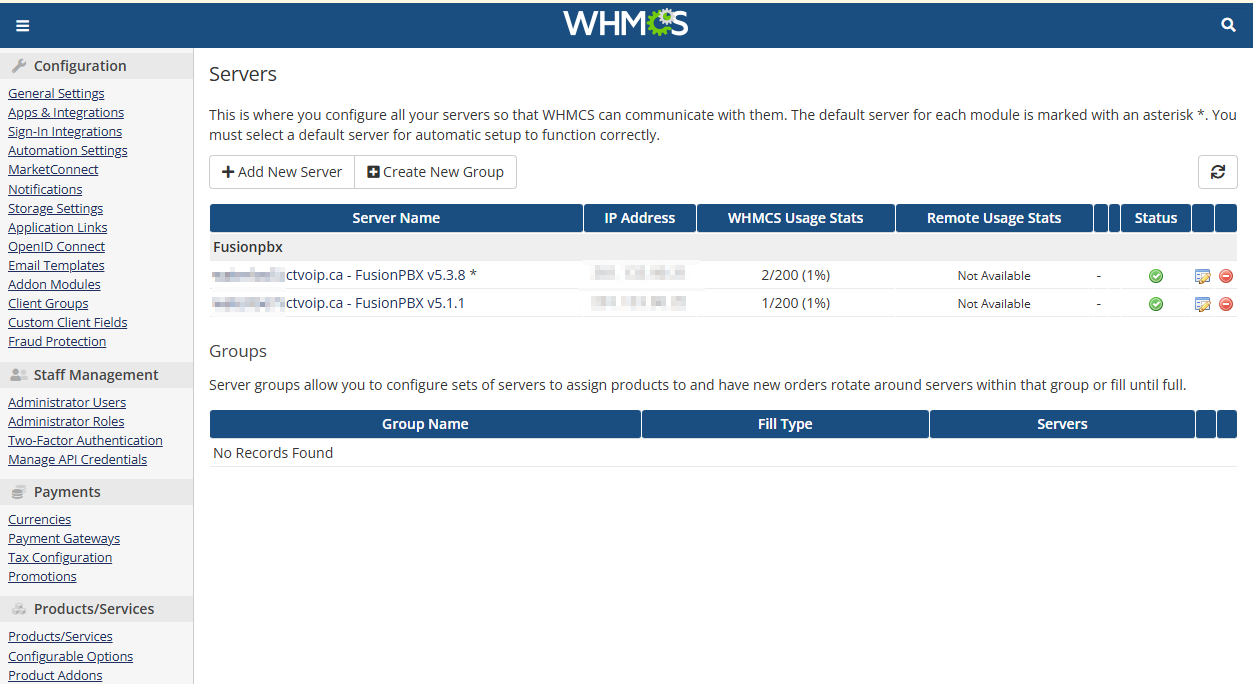
Server Configuration
Step 1: Access Server Management
Navigate to your WHMCS admin panel: * System Settings → Products & Services → Servers
Step 2: Add New Server
Click Add New Server and configure the following settings:
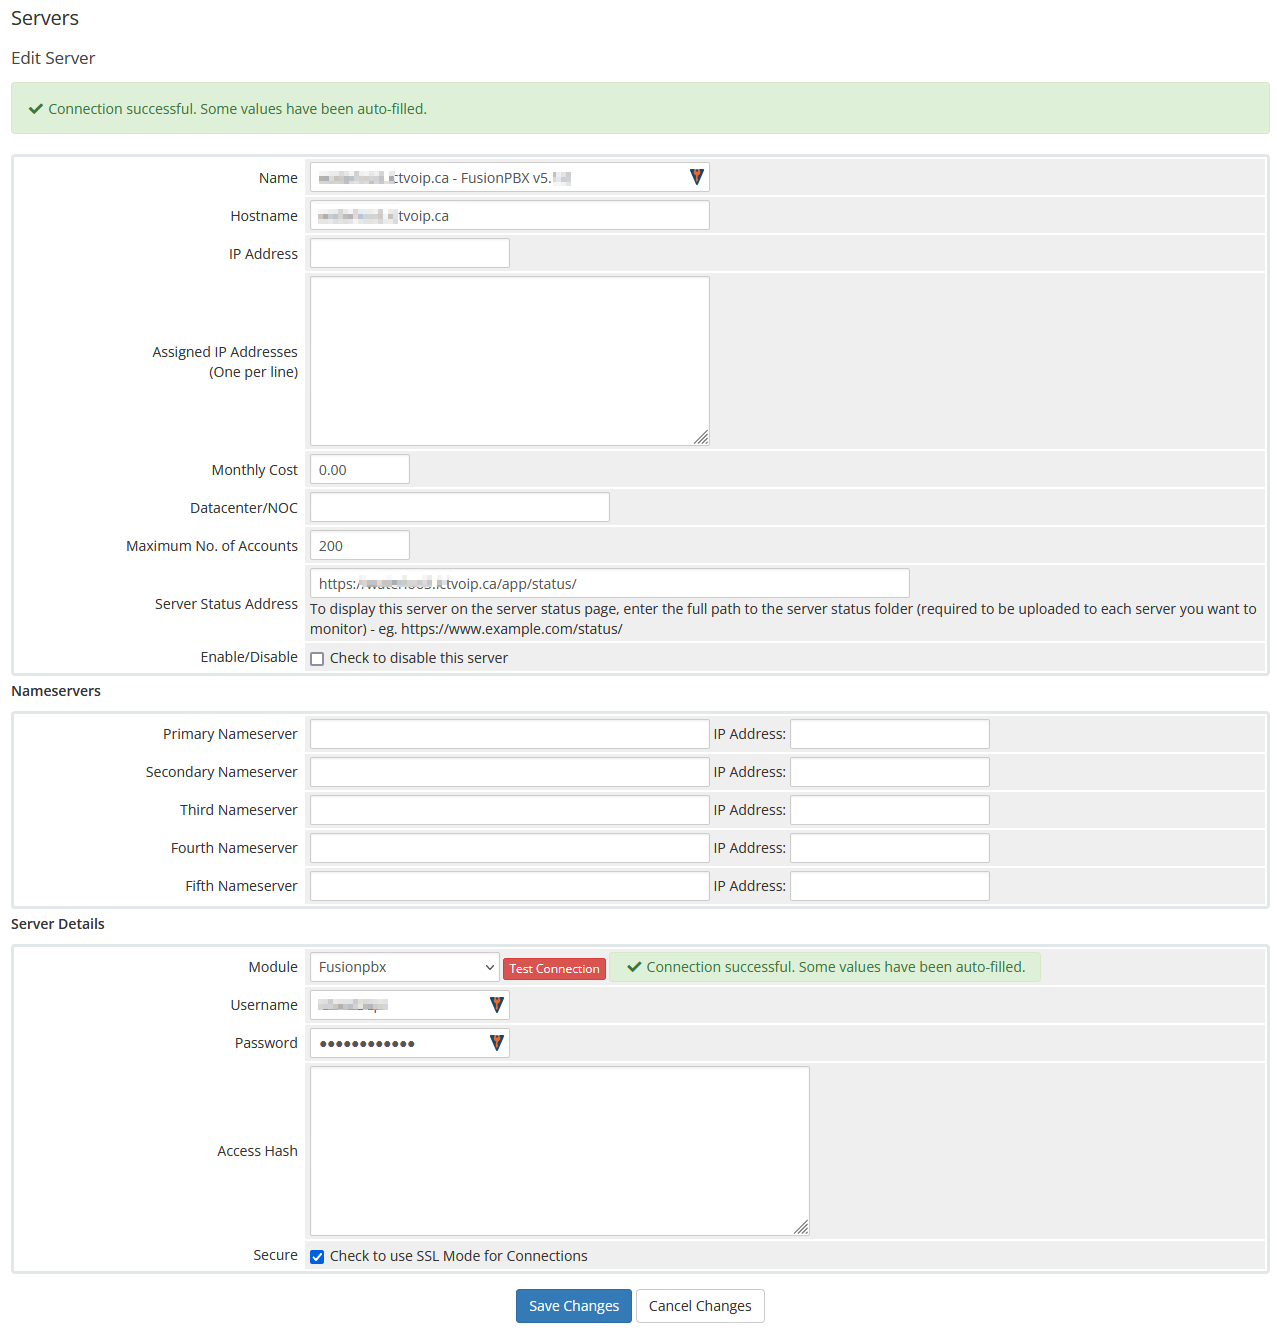
Required Configuration:
Server Name: voipsrv1.ictvoip.ca - FusionPBX v5.1.1
Hostname: voipsrv1.ictvoip.ca
IP Address: 102.100.100.20
Assigned IP addresses: 102.100.100.20
Maximum No. of Accounts: 100
Module: Fusionpbx
Username: voipsrv1api
Password: [YOUR_SECURE_PASSWORD]
Configuration Details:
Server Name: Descriptive name for your server
Hostname: FQDN with active SSL certificate
IP Address: Local or public IP address
Assigned IP: IP addresses available for this server
Maximum Accounts: Maximum tenants or extensions
Module: Select “Fusionpbx” from dropdown
Username: FusionPBX API user with superadmin rights
Password: Secure password for API user
Step 3: Create API User
On your FusionPBX server, create a new user with superadmin group rights:
-- Create API user in FusionPBX database
INSERT INTO v_users (user_uuid, domain_uuid, username, password, salt, user_enabled)
VALUES (uuid_generate_v4(), 'your-domain-uuid', 'ictwat3api', 'hashed_password', 'salt', 'true');

INSERT INTO v_group_users (group_user_uuid, domain_uuid, group_name, user_uuid, group_user_enabled)
VALUES (uuid_generate_v4(), 'your-domain-uuid', 'superadmin', 'user-uuid', 'true');
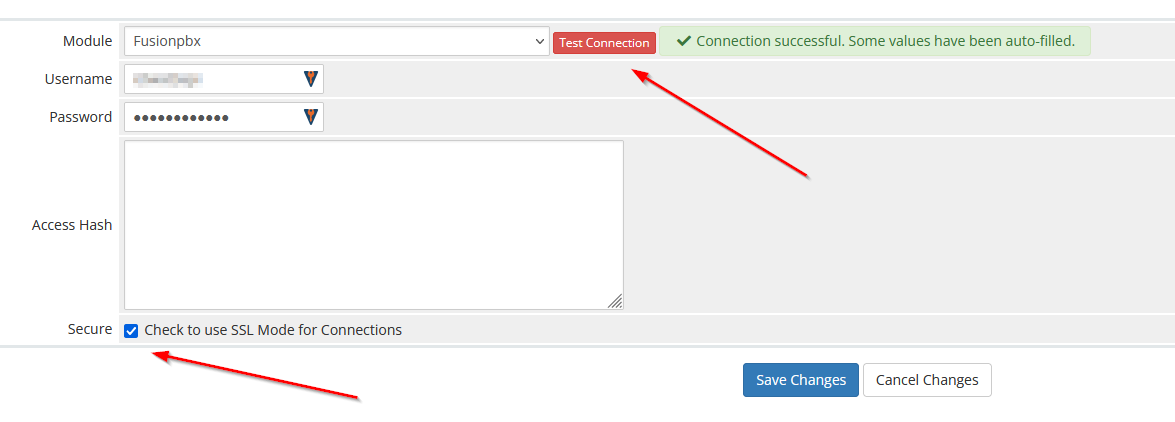
Connection Verification
Test Server Connection:
In WHMCS, go to Servers → Test Connection
Verify the connection is successful
Check for any error messages
Common Connection Issues:
SSL Certificate: Ensure valid SSL certificate on FusionPBX
Firewall: Check firewall rules allow API access
API User: Verify API user has correct permissions
Network: Ensure network connectivity between WHMCS and FusionPBX
API Endpoint Testing:
Test the API endpoints directly:
# Test connection endpoint
curl -u username:password https://your-fusionpbx-domain.com/app/xml_cdr/chkcon.php

# Test CDR export
curl -u username:password https://your-fusionpbx-domain.com/app/xml_cdr/export_cdr.php
Security Considerations
Best Practices:
Use strong, unique passwords for API users
Enable SSL/TLS encryption
Restrict API access to specific IP addresses
Regularly update API user credentials
Monitor API access logs
Firewall Configuration:
Ensure your firewall allows API communication:
# Allow HTTPS traffic to FusionPBX
ufw allow 443/tcp

# Allow specific IP ranges if needed
ufw allow from WHMCS_IP to any port 443
Troubleshooting
Common Issues:
Connection Failed: Check hostname, credentials, and network connectivity
Permission Denied: Verify API user has superadmin rights
SSL Errors: Ensure valid SSL certificate is installed
Module Not Found: Verify server module files are properly installed
Debug Steps:
Check WHMCS error logs
Verify FusionPBX API accessibility
Test API credentials manually
Review firewall and network configuration
Support:
For additional support, contact our team with: * WHMCS version and PHP version * FusionPBX version * Error messages and logs * Network configuration details
Next Steps
After successful server configuration:
Provider Setup - Configure VoIP providers
Tariff Configuration - Set up pricing structure
Package Creation - Create service packages
Client Provisioning - Set up client accounts
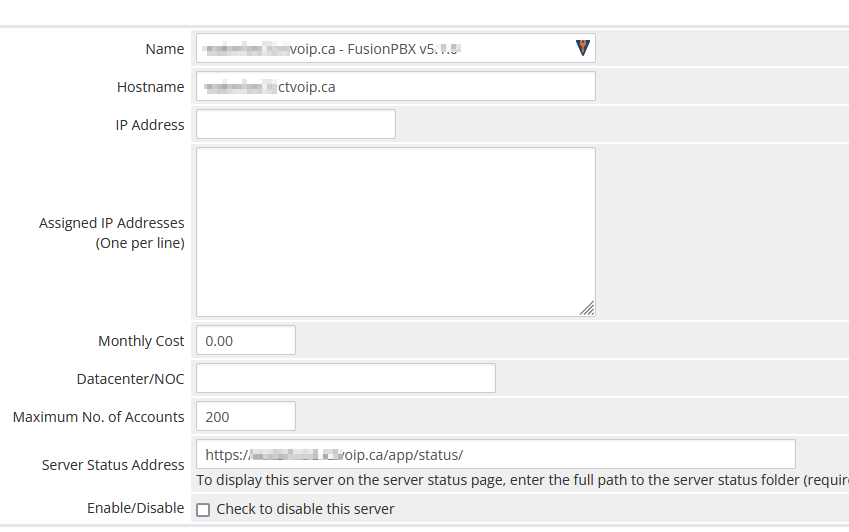

Server Module Requirements:
Server Name [Just text] could be the FQDN of your hosted FusionPBX.
Name: voipsrv1.ictvoip.ca - FusionPBX v5.3.x
Hostname must be the FQDN of your hosted FusionPBX with active SSL certificate.
Hostname: voipsrv1.ictvoip.ca
IP Address can be the local IP or public
IP Address: 102.100.100.20
Assigned IP can be the local IP or public
Assigned IP addresses: 102.100.100.20
Maximum Accounts would typically be the maximum allowed tenants or the maximum total extensions for that PBX
Maximum No. of Accounts: 100
Module in this case we select the Fusionpbx server module
Module: Fusionpbx
This user should be created on the Fusion PBX side with superadmin group rights.
Username: ictvoipsrvapi
This would be the password assigned to the FusionPBX API user
Password: [PASSWD]
Add more as required.
Server Connection Verification
** You must have SSL certificate installed on your FusionPBX server host name. **
After your server details have been entered and saved you can now test your connection to your FusionPBX by clicking on the Test button next to the Server Module “FusionPBX”. After clicking you should see “Attempting Connection” then if suscessful your should get “Connection successful.” If there is a problem connecting with your FusionPBX server then you will have to further troubleshoot the issue before you continue your setup.
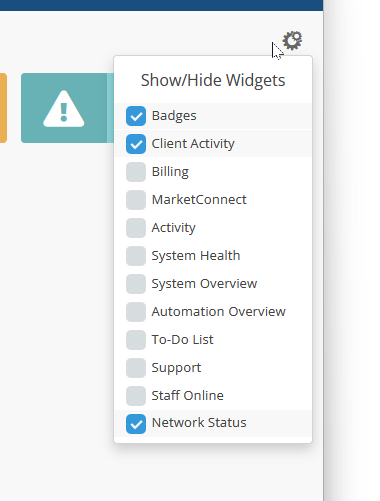
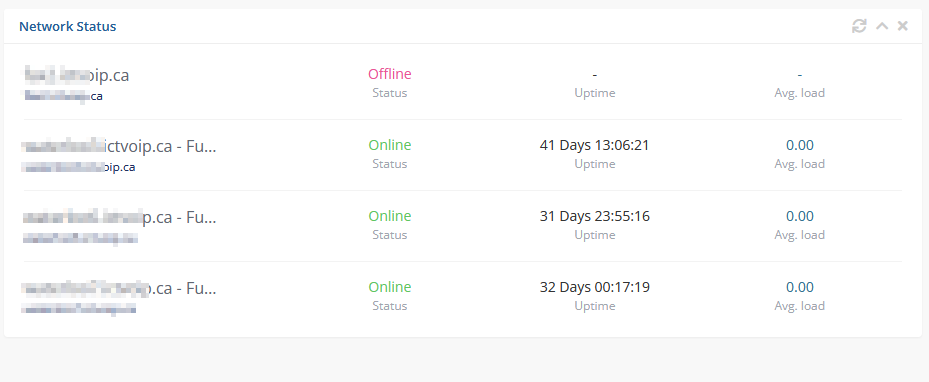
Server Widget
This feature is optional
FusionPBX Status Widget
Adding a FusionPBX Status Widget for your Servers can be accomplished by the following steps:
Copy from your WHMCS host
/home/$user/public_html/status/index.php
to your FusionPBX host. Create the status directory if it does not exist.
/var/www/fusionpbx/app/status/index.php
chown -R www-data:www-data /var/www/fusionpbx/app/status
WHMCS Setup
Add the status script location to your WHMCS Fusion PBX Server.
WHMCS / System Settings / Serversselect edit the server to monitor and enter the URL for “Server Status Address”
https://myfusionpbx.ca/app/status/
Then save.
Add the Widget to your WHMCS Admin area by selecting the “Network Status” from the COG settings for Widgets at the top right of the Admin Dashboard.